
Navigation
Install the app
How to install the app on iOS
Follow along with the video below to see how to install our site as a web app on your home screen.
Note: This feature may not be available in some browsers.
More options
You are using an out of date browser. It may not display this or other websites correctly.
You should upgrade or use an alternative browser.
You should upgrade or use an alternative browser.
This site may earn a commission from merchant affiliate
links, including eBay, Amazon, and others.
links, including eBay, Amazon, and others.
More options
Who Replied?- Messages
- 1,325
- Reaction score
- 1,745
- RC Driving Style
- Racing
- Thread starter
- #62
Some updates...
I tried out some different bellcranks after another Kyosho fan pointed me in that direction as they were at first glance a better replacement than using the Slash versions, but found that the spacing was too tight to use my aluminum rod ends, so reverted back to the Slash ones, and in the process discovered that I really had the rear steering way out of whack originally. I spent some hours reconfiguring, aligning, tweaking, and now have it running super straight.
Last night while running my drag car, I had the truck out too, in the street just to see how it would run. It was in fact very straight, and while not the quickest off the line in comparison to the drag car, much like the drag car the truck lost traction as the engine hit it's power band, in a more frightening way, hearing those four massive tires hopping on dry pavement made me a bit nervous. I wonder about the gearing. On launch, the gearing is too tall, it doesn't wheelie, but when it hits the power band in 10 feet, all hell breaks loose and the tires start hopping and spinning. I have to figure out how to translate the power smoothly, and I'm wondering if I should put in the 13t pinion and try, which would basically put it at the stock 1st gear ratio. I mean, how much top end do I need for this kind of racing really? It might be easier to pedal the throttle more smoothly. That, and changing the radio, man the stock Kyosho radio sucks, after using my FlySky on the drag car I realized I need to invest in a really nice radio for this thing.
On another note I painted a new Pouncer body for my IS truck, I had the body laying around for a while and just finally got around to it. Going to work on this one a bit over the next couple of weeks. This was my first nitro MT, bought in 2008. I pretty much replaced every part before it ever even started, lol. Yeah, I know, Integy A-arms, but I've ran that thing around tracks quite a bit, plenty of wrecks, and they've held up somehow. My thought was always with track racing that I could finish a race with a bent arm instead of a broken one. I do actually have some RPM arms that I bought in case that I've meant to dye orange for this truck, but just haven't bothered. This truck is now configured for MJ style racing, specifically I wanted to run it at the world finals at Diggers this spring, but well...covid. Next year I hope to run my trucks there.


Doing some stuff to lighten the truck too, ditched the front bumper(replacing with a clear lexan piece with the Monster Jam logo on it). Will remove the entire rear bumper assembly as it really serves no purpose at all with the wheelie bar there. Both of those bumpers were pretty heavy.
On yet another note, in the bottom pic the min-dragon sits, I do have all of the parts and did some more work on that, but for now it's being put off as a Winter project.
I tried out some different bellcranks after another Kyosho fan pointed me in that direction as they were at first glance a better replacement than using the Slash versions, but found that the spacing was too tight to use my aluminum rod ends, so reverted back to the Slash ones, and in the process discovered that I really had the rear steering way out of whack originally. I spent some hours reconfiguring, aligning, tweaking, and now have it running super straight.
Last night while running my drag car, I had the truck out too, in the street just to see how it would run. It was in fact very straight, and while not the quickest off the line in comparison to the drag car, much like the drag car the truck lost traction as the engine hit it's power band, in a more frightening way, hearing those four massive tires hopping on dry pavement made me a bit nervous. I wonder about the gearing. On launch, the gearing is too tall, it doesn't wheelie, but when it hits the power band in 10 feet, all hell breaks loose and the tires start hopping and spinning. I have to figure out how to translate the power smoothly, and I'm wondering if I should put in the 13t pinion and try, which would basically put it at the stock 1st gear ratio. I mean, how much top end do I need for this kind of racing really? It might be easier to pedal the throttle more smoothly. That, and changing the radio, man the stock Kyosho radio sucks, after using my FlySky on the drag car I realized I need to invest in a really nice radio for this thing.
On another note I painted a new Pouncer body for my IS truck, I had the body laying around for a while and just finally got around to it. Going to work on this one a bit over the next couple of weeks. This was my first nitro MT, bought in 2008. I pretty much replaced every part before it ever even started, lol. Yeah, I know, Integy A-arms, but I've ran that thing around tracks quite a bit, plenty of wrecks, and they've held up somehow. My thought was always with track racing that I could finish a race with a bent arm instead of a broken one. I do actually have some RPM arms that I bought in case that I've meant to dye orange for this truck, but just haven't bothered. This truck is now configured for MJ style racing, specifically I wanted to run it at the world finals at Diggers this spring, but well...covid. Next year I hope to run my trucks there.
Doing some stuff to lighten the truck too, ditched the front bumper(replacing with a clear lexan piece with the Monster Jam logo on it). Will remove the entire rear bumper assembly as it really serves no purpose at all with the wheelie bar there. Both of those bumpers were pretty heavy.
On yet another note, in the bottom pic the min-dragon sits, I do have all of the parts and did some more work on that, but for now it's being put off as a Winter project.
Tunedfrog
Kermit the frog is a sissy.
Supporter
Military Veteran
Hospitality Award
Build Thread Contributor
That's a bad a*^ truck....

- Messages
- 1,325
- Reaction score
- 1,745
- RC Driving Style
- Racing
- Thread starter
- #64
Took the Pouncer and the rest of my fleet out for some practice and tuning, so took some pics while it still looks pristine 


That old T-Maxx still gets up nicely, and one of the best driving trucks I've ever had, despite it being a bit on the hefty side. I got a chance to tune and tweak it really good for the first time in a while. Many bodies have lived on that truck, but the Pouncer was always my fav, and having this nice new one is pretty satisfying.
The Zombie was running well for a bit, but that old TRX2.5 is about done, just too many problems. Gonna swap it out with a Dynamite .19 like the Pouncer has. I really like how the Maxx wheel/tire combo looks and works on this truck.
Of course spent a lot of time with the Dragonoid....

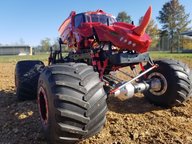
This truck is just plain mean, lol. I ditched the Kyosho stock radio for a Spectrum DX5 Rugged, and really like how that feels both in my hand, and how it smooth it is in comparison. I'm getting this truck dialed in gradually I think. The suspension is softer and less bouncy now, I got the rear steer fixed and overall steering much improved with getting some things right and lined up better. The engine has finally let loose and man it's crazy when that happens, just how much power a .28 p8 has. It's really fun to drive this thing, even if it's grossly overpowered. But that is more manageable with the new radio, just better feel and able to get it more controllable. This truck is complete now, can't think of anything else to change on it(maybe beefier steering links, but clearance is a real problem doing that), just getting better driving it is my goal for now.
That old T-Maxx still gets up nicely, and one of the best driving trucks I've ever had, despite it being a bit on the hefty side. I got a chance to tune and tweak it really good for the first time in a while. Many bodies have lived on that truck, but the Pouncer was always my fav, and having this nice new one is pretty satisfying.
The Zombie was running well for a bit, but that old TRX2.5 is about done, just too many problems. Gonna swap it out with a Dynamite .19 like the Pouncer has. I really like how the Maxx wheel/tire combo looks and works on this truck.
Of course spent a lot of time with the Dragonoid....
This truck is just plain mean, lol. I ditched the Kyosho stock radio for a Spectrum DX5 Rugged, and really like how that feels both in my hand, and how it smooth it is in comparison. I'm getting this truck dialed in gradually I think. The suspension is softer and less bouncy now, I got the rear steer fixed and overall steering much improved with getting some things right and lined up better. The engine has finally let loose and man it's crazy when that happens, just how much power a .28 p8 has. It's really fun to drive this thing, even if it's grossly overpowered. But that is more manageable with the new radio, just better feel and able to get it more controllable. This truck is complete now, can't think of anything else to change on it(maybe beefier steering links, but clearance is a real problem doing that), just getting better driving it is my goal for now.
Attachments
Last edited:
Just an endless fleet of seriously sick stuff. SICK, I SAY...REALLY sick. 
LibertyMKiii
RCTalk Champion
Your RCs are much nicer than this, but another option for your future builds:
https://www.horizonhobby.com/product/lmt-4wd-solid-axle-monster-truck-roller/LOS04022.html
https://www.horizonhobby.com/product/lmt-4wd-solid-axle-monster-truck-roller/LOS04022.html
- Messages
- 1,325
- Reaction score
- 1,745
- RC Driving Style
- Racing
- Thread starter
- #67
Your RCs are much nicer than this, but another option for your future builds:
https://www.horizonhobby.com/product/lmt-4wd-solid-axle-monster-truck-roller/LOS04022.html
Hmmm wonder if I could stuff a nitro into that
D3MON
Hardcore RCTalk User
lol kind of wondering the same thing, I'm wondering if putting a nitro ST transmission like from a rustler sideways, mounted on the side vertical plates, with cutouts in the chassis.... have some prelim drawings i been working on to do similar to make a solid axle nitro MT. that way would keep the brake assembly, and be very compact.Hmmm wonder if I could stuff a nitro into that
thinking it would be able to lower the COG doing it that way compared to how most of the others are done.
- Messages
- 1,325
- Reaction score
- 1,745
- RC Driving Style
- Racing
- Thread starter
- #69
That would be pretty badass, if you do it you gotta post a tutorial!
- Messages
- 1,325
- Reaction score
- 1,745
- RC Driving Style
- Racing
- Thread starter
- #70
Should have some updates on this guy soon, I'm waiting for a spare set of shocks that I'm going to mod. I've been running the Dragonoid and Pouncer a lot as of late, practicing tight turns and coming out of them into 2 foot wide spaces (that would normally be ramps). Both trucks are handling really well, but the Dragonoid needs some improvement with the bounciness when I do hit ramps. I dropped to 30 wt oil, but the shocks need to be modded, they are still a bit too firm. I'm only running the medium springs in the piggybacks, no springs in the skinny black shocks. It's stance is also a little too "nose up", so thinking of some mods to make here to level it out. Part of the problem with the bounciness is that the axles and wheels are pretty heavy, so I'd have to do something with the foams in the tires to get rid of all of it, but I do want to at least get some out of the chassis with more forgiving shock configurations.
Overall the steering is pretty good, I've got it dialed in, it's not snaking, and it's turning on a dime. Not sure if I mentioned but I switched radios to the Spectrum 5 Rugged. It's definitely a smoother feeling radio than the stock Kyosho, which I then put in the Pouncer because the old Futaba was getting seriously wonky for some reason. The truck is insanely quick, probably way overpowered - I'm mostly using 1/4 throttle, anything more and it either spins out, or it's wheelying all over the place. Leveling it out will help for sure - but thrashing it has resulted in exploded steel swingshafts multiple times.
On another note I'm working on the 1/16 truck - which I decided to do as a mini Megaladon because I'm not pleased with the mini-dragoniod fitment, and I really hate having two trucks with the same theme. Still working out a bunch of engineering on this one, but it's getting closer. I printed out a form to vacuum form over this weekend, so pics maybe a new thread forthcoming for that project.
- Messages
- 1,325
- Reaction score
- 1,745
- RC Driving Style
- Racing
- Thread starter
- #71
So I put in the new shocks, and really softened them up on all four corners. I have spent the past couple of weekends with some warmer weather really working on getting this thing right. For the most part things have held up. Had one of the metal ball ends on the links come apart, put some loctite on it, repressed it, and it stayed together. That's not the first one of those RC4WD aluminum ends that have done this to me.
However...the truck is still really bouncy. It's all over the place on rougher terrain, and anything other than small jumps, it's bouncing out of control. I can't make the shocks any softer. I'm sure part of it is the swaybar, but it's bouncing pretty hard with the straight drop test too. Also, traction is still a huge, huge problem. Anything more than 1/4 throttle, at any speed, but especially if it's in the powerband, it's breaking loose and getting squirrely and out of control. I realize I have a 4hp engine in a 12lb truck, but I'm like Tim Allen..moar power! So I'm not going to put the 3 port engine, or the stock KE25 back in, gonna keep the 8 port .28 in and keep trying to get it dialed in better. I'm running JConcepts Firestorms, gold compound. From what I can tell 90% or more of the bounce is coming from the axle/tire combo, a lot, I mean a LOT of the weight of the truck is there.
So my next move to try, is taking the foams out of the tires. Since I'm running beadlocks I don't think they'll come loose or anything. Hoping they are firm enough without the foams, but if not I'll try putting something much softer in. Really hoping this kills two birds with one stone.
- Messages
- 1,325
- Reaction score
- 1,745
- RC Driving Style
- Racing
- Thread starter
- #72
So my next move to try, is taking the foams out of the tires. Since I'm running beadlocks I don't think they'll come loose or anything. Hoping they are firm enough without the foams, but if not I'll try putting something much softer in. Really hoping this kills two birds with one stone.
Ok, well...that didn't work out so well
Took the foams out, drilled single 1/8 inch holes in each rim. Re-assembled. Did some bounce testing - certainly much softer and less rebound. Two hours later(lotta screws on these beadlocks), took it out for a little test on a baseball diamond. It definitely took off much better(but the sidewall wrinkling was very noticeable), but man, around the turns, it was rolling really hard on the sidewalls and the handling was squirrelly and swimmy. Took it all apart. Put the foams back in. Bounce tested. Interestingly, even less rebound than without. Seems all it really needed was the vent holes. Never even occurred to me before the reason those tires were so hard was cuz they were inflated, lol. I guess I assumed that like all of my other rims they were somehow vented.By now my hands were really sore from all of that wrenching. Ran over to the ballfield, and drove it around a bit before dark. Handling was close to original, maybe a slight bit more roll, but manageable. This truck's got a pretty wide wheelbase, and with the swaybar in the rear, it can get around turns at least as good as my T-Maxx's, maybe better, given it's 4 wheel steering. The real test though was how was it under acceleration, and it definitely is a huge improvement there. Enough to get it's nose up easily in loose dirt. Ran it over some rough areas, still a little bouncy, but not as bad as before, will have to see how it handles jumping small ramps and crush cars.
Gonna leave it with just 1 1/8 hole per rim. I feel like any softer and I'm going to lose the cornering prowess.
- Messages
- 1,325
- Reaction score
- 1,745
- RC Driving Style
- Racing
- Thread starter
- #73
Ran the truck pretty hard this weekend. Couple of things broke. One was the m3 that was holding one of the bell cranks, which was an easy fix and I was back to racing my buddy. Pull start broke on the Pouncer, the spring itself decided to break. (makes note to order spares). The other thing that broke on Bakugan was kinda weird...

OWB cracked, and while I could see this happening in a case where maybe the engine was flooded and the roto start caused the break, I didn't flood the engine at any point, never had the engine jammed. Weird. I usually carry a spare engine with me, but this day I did not, of course, Murphy's law.
Got it back together that night tho

Otherwise the truck seems to be getting gradually more bullet proof. The body has taken a beating, it's pretty scuffed up, but other than having to replace the rubber horn a couple of times, it's surprisingly been durable.
Still not entirely happy with the bounciness. It's definitely much less, and gripping way better under acceleration, but it's not good enough. So, I've ordered a second set of the same rims, which I'll drill out a second vent, and I'm going to put blue compound Renegades on those.
Might be hard to see in the pic, but I replaced the stock front bumper with the alloy one from Kyosho, to add some weight to the chassis over the axles. I'm going to do the same with the wheelie bar as well, again, putting weight over the axles. I think having shaved off weight replacing the sideplates with CF might be contributing to the bounce, and hopefully putting weight back on directly where it needs it will improve it some.
OWB cracked, and while I could see this happening in a case where maybe the engine was flooded and the roto start caused the break, I didn't flood the engine at any point, never had the engine jammed. Weird. I usually carry a spare engine with me, but this day I did not, of course, Murphy's law.
Got it back together that night tho
Otherwise the truck seems to be getting gradually more bullet proof. The body has taken a beating, it's pretty scuffed up, but other than having to replace the rubber horn a couple of times, it's surprisingly been durable.
Still not entirely happy with the bounciness. It's definitely much less, and gripping way better under acceleration, but it's not good enough. So, I've ordered a second set of the same rims, which I'll drill out a second vent, and I'm going to put blue compound Renegades on those.
Might be hard to see in the pic, but I replaced the stock front bumper with the alloy one from Kyosho, to add some weight to the chassis over the axles. I'm going to do the same with the wheelie bar as well, again, putting weight over the axles. I think having shaved off weight replacing the sideplates with CF might be contributing to the bounce, and hopefully putting weight back on directly where it needs it will improve it some.
D3MON
Hardcore RCTalk User
truck is looking so good! good to see progress to perfect your designRan the truck pretty hard this weekend. Couple of things broke. One was the m3 that was holding one of the bell cranks, which was an easy fix and I was back to racing my buddy. Pull start broke on the Pouncer, the spring itself decided to break. (makes note to order spares). The other thing that broke on Bakugan was kinda weird...
View attachment 126215
OWB cracked, and while I could see this happening in a case where maybe the engine was flooded and the roto start caused the break, I didn't flood the engine at any point, never had the engine jammed. Weird. I usually carry a spare engine with me, but this day I did not, of course, Murphy's law.
Got it back together that night tho
View attachment 126216
Otherwise the truck seems to be getting gradually more bullet proof. The body has taken a beating, it's pretty scuffed up, but other than having to replace the rubber horn a couple of times, it's surprisingly been durable.
Still not entirely happy with the bounciness. It's definitely much less, and gripping way better under acceleration, but it's not good enough. So, I've ordered a second set of the same rims, which I'll drill out a second vent, and I'm going to put blue compound Renegades on those.
Might be hard to see in the pic, but I replaced the stock front bumper with the alloy one from Kyosho, to add some weight to the chassis over the axles. I'm going to do the same with the wheelie bar as well, again, putting weight over the axles. I think having shaved off weight replacing the sideplates with CF might be contributing to the bounce, and hopefully putting weight back on directly where it needs it will improve it some.
that is really strange on the OWB, but glad you were able to get it fixed and ready to go again! stil just blown away with the outcome of your build.- Messages
- 1,325
- Reaction score
- 1,745
- RC Driving Style
- Racing
- Thread starter
- #75
truck is looking so good! good to see progress to perfect your design
Thanks man!
There's a guy that's been using my blog articles to build a similar truck, and we've been bouncing ideas back and forth lately. The one area we are both trying to work on is the steering and how it's using this flimsy tube clamp bracket to mount the bell cranks that allow for flex and create sloppiness. We both tried to find something online that would be suitable, but so far no luck. So, I'm going to model a new bracket, print out a prototype, and then if it fits right, send it out to be CNC'd. Might even do the link mounts as well.
- Messages
- 1,325
- Reaction score
- 1,745
- RC Driving Style
- Racing
- Thread starter
- #76
Lotta stuff going on with this truck. One, I've been using it a lot Practicing for a local event, and for the RC World Finals at Diggers. I have made some upgrades/changes, and am still waiting on quite a few things to come.
The first update was to replace the steering brackets. I wound up using a two piece clamping collar and carbon fiber to fabricate a much stronger mount. Now there is very little flex of any kind, and it steers *really* nice. Was able to get rid of the 1mm tolerance(aka, slop) by making the CF part 1mm longer to press up against the axle. Maybe not the perfect solution (more on the dreadful lack of 24mm collars later), but worked extremely well, very adjustable, and holds in place.


My next idea after that, was mostly cosmetic to complete the look of the axle, and that was to use one piece set screw collars and CF to create custom link mounts. The biggest hurdle was again, that finding 24mm aluminum collars was near impossible. So 25mm it was, and had to figure out a way to minimize the slop in a way that was accurate.

I purposefully mounted the CF a little inward to the bore, to close that gap, and hold the thing in place. This first one worked out well actually, and the axle alignment was spot on with the stock mount on the other side.

However, when I moved on the the next one, I found that getting two of these perfectly matched was a bit of a chore(no, nightmare). My second one wound up with a couple of "extra" holes, some major cussing, and in the end I couldn't get things perfect, largely because of this 1mm slop, and my lack of a drill press and proper clamping to hold things in place. I do have a drill press in the works, but I'm going to only revisit this if I can come up with 24mm aluminum collars. I have fabbed some up for CNC, and am waiting on a quote. If it's reasonable, I'll revisit (but probably after the RC World Finals). I took this time to also replace the stock cast steering knuckles with machined parts.
I also was able to snag some aluminum mounts for the panhard bars, potentially leaving the only real plastic left on this thing the body posts. Oh...those...
I got an idea to create body posts that could absorb some shock on rollovers/hard landings on lid. The idea was to use 8mm CF tubes as a base, with 6mm plastic rod inserts that used an internal shock spring. The upward travel would be contained using travel limiting straps. I was able to snag some body mounts from Yeah Racing that matched the color scheme, and some 80mm Hot Racing non-adjustable straps. This worked perfectly for the rear and the height I was using, the front was a different story, but luckily by attaching it to the bottom bolt, the upper bolt pushed out the slack perfectly, so got lucky there And the buckles are bolted tightly in place, and come right up to the bolt, so the strap cannot move to the side of the bolt either.

The posts will be cut off to proper height, and 3mm set screws with anodized red thumbscrews and rubber grommets used to hold the body on. Wish I could have found some black 6mm plastic rods, but this is what was available(white). The system is a little more flexible than the stock plastic assembly, but not by much, but offers a little shock absorption vertically that should help protect the body a little more.
My Renegades came last night too, so I will definitely get a chance to try out these other tire combos this weekend.
Practicing for a local event, and for the RC World Finals at Diggers. I have made some upgrades/changes, and am still waiting on quite a few things to come. The first update was to replace the steering brackets. I wound up using a two piece clamping collar and carbon fiber to fabricate a much stronger mount. Now there is very little flex of any kind, and it steers *really* nice. Was able to get rid of the 1mm tolerance(aka, slop) by making the CF part 1mm longer to press up against the axle. Maybe not the perfect solution (more on the dreadful lack of 24mm collars later), but worked extremely well, very adjustable, and holds in place.
My next idea after that, was mostly cosmetic to complete the look of the axle, and that was to use one piece set screw collars and CF to create custom link mounts. The biggest hurdle was again, that finding 24mm aluminum collars was near impossible. So 25mm it was, and had to figure out a way to minimize the slop in a way that was accurate.
I purposefully mounted the CF a little inward to the bore, to close that gap, and hold the thing in place. This first one worked out well actually, and the axle alignment was spot on with the stock mount on the other side.
However, when I moved on the the next one, I found that getting two of these perfectly matched was a bit of a chore(no, nightmare). My second one wound up with a couple of "extra" holes, some major cussing, and in the end I couldn't get things perfect, largely because of this 1mm slop, and my lack of a drill press and proper clamping to hold things in place. I do have a drill press in the works, but I'm going to only revisit this if I can come up with 24mm aluminum collars. I have fabbed some up for CNC, and am waiting on a quote. If it's reasonable, I'll revisit (but probably after the RC World Finals). I took this time to also replace the stock cast steering knuckles with machined parts.
I also was able to snag some aluminum mounts for the panhard bars, potentially leaving the only real plastic left on this thing the body posts. Oh...those...
I got an idea to create body posts that could absorb some shock on rollovers/hard landings on lid. The idea was to use 8mm CF tubes as a base, with 6mm plastic rod inserts that used an internal shock spring. The upward travel would be contained using travel limiting straps. I was able to snag some body mounts from Yeah Racing that matched the color scheme, and some 80mm Hot Racing non-adjustable straps. This worked perfectly for the rear and the height I was using, the front was a different story, but luckily by attaching it to the bottom bolt, the upper bolt pushed out the slack perfectly, so got lucky there
And the buckles are bolted tightly in place, and come right up to the bolt, so the strap cannot move to the side of the bolt either.The posts will be cut off to proper height, and 3mm set screws with anodized red thumbscrews and rubber grommets used to hold the body on. Wish I could have found some black 6mm plastic rods, but this is what was available(white). The system is a little more flexible than the stock plastic assembly, but not by much, but offers a little shock absorption vertically that should help protect the body a little more.
My Renegades came last night too, so I will definitely get a chance to try out these other tire combos this weekend.
WOW.... thats all I got. lol
really awesome stuff!
really awesome stuff!
- Messages
- 1,325
- Reaction score
- 1,745
- RC Driving Style
- Racing
- Thread starter
- #78
The body post project is finished, and I think it'll work out pretty good! It definitely absorbs a good bit of the shock, we'll see how well it holds up in real-time this weekend. This body has held up with only some scuffing and torn rubber horns, despite landing on it's lid numerous times, but the mount tabs in the rear that were needed due to the unconventional body shape were often sacrificial because I started using lighter gauge lexan after noticing some cracking in the area on the body where they mounted. Now I've gone back to the stronger tabs, and I plopped it down a few times on the floor moderately, without any damage occurring in that area. Could see the posts compress, and they don't compress or move laterally enough to cause the body to hit the engine or anything else.


The thumbnuts are nicely held in place using the rubber grommets, so they won't back out easily. I do believe I need to get a lot of spares of these though, I can totally see me losing grommets and thumbnuts in the grass, lol.
Started putting the Renegades on the new bead locks wheels. Did a bounce test with the combos next to the Firestorms, and yeah, these things are quite softer (blue vs gold compound). Can't wait to see how it handles in comparison on different surfaces. Definitely gonna be too sticky for grass, but should be great in the dirt(I hope) for acceleration.
- Messages
- 1,325
- Reaction score
- 1,745
- RC Driving Style
- Racing
- Thread starter
- #79
My aversion for plastic continues...as I decided to make a CF wheelie bar, was not a fan of the flimsy plastic stock one, especially given my swaybar is routed through and supported by it, there was quite a bit of flex going on there. I also decided to go the route of incorporating the shock stays into the piece, similar to how some of the aftermarket ones did that sadly no longer exist. This in the end resulted in the shocks being mounted at a more severe splayed angle, as the shock stays were more inward compared to what it replaced, which means I can either use bigger offsets at the top, or mount the lower ones on the inside of my link mounts once I get my custom ones finished, which will make them much more vertical and eliminate any binding.

Managed to not lose any digits during the making of these I used a bandsaw to get a rough cut, then cutting wheel and bits with a dremel tool to finish them up.

Preliminary mounting, making sure all lined up right. I bolted these together to do the holes, a lesson learned from failed attempt at link mounts.

Used CF tubes that I threaded as cross braces.

Wasn't really sure what to do with the actual wheelie bar wheel shaft, I had contemplated putting two of the stock ones on, or two of the little drag race ones. In the end I decided to keep the stock one in the center, and add the drag race concepts aluminum ones to the outside, to give the bar itself some protection and stability. You can kinda see the "splayed" nature of the shocks, with the top mounts now being a few mm inward and causing some minor binding at full compression. If I use the same offset size I used at the bottom, it should help, but ultimately those link mounts are getting replaced with the CF/aluminum ones I am working on, and that will move the bottoms inward enough.

There is almost no plastic left, and very little of the original Mad Crusher.
Managed to not lose any digits during the making of these
I used a bandsaw to get a rough cut, then cutting wheel and bits with a dremel tool to finish them up. Preliminary mounting, making sure all lined up right. I bolted these together to do the holes, a lesson learned from failed attempt at link mounts.
Used CF tubes that I threaded as cross braces.
Wasn't really sure what to do with the actual wheelie bar wheel shaft, I had contemplated putting two of the stock ones on, or two of the little drag race ones. In the end I decided to keep the stock one in the center, and add the drag race concepts aluminum ones to the outside, to give the bar itself some protection and stability. You can kinda see the "splayed" nature of the shocks, with the top mounts now being a few mm inward and causing some minor binding at full compression. If I use the same offset size I used at the bottom, it should help, but ultimately those link mounts are getting replaced with the CF/aluminum ones I am working on, and that will move the bottoms inward enough.
There is almost no plastic left, and very little of the original Mad Crusher.
D3MON
Hardcore RCTalk User
oh man... this build just keeps getting better and better even when i didnt think it was possible it could! as always, amazing work!My aversion for plastic continues...as I decided to make a CF wheelie bar, was not a fan of the flimsy plastic stock one, especially given my swaybar is routed through and supported by it, there was quite a bit of flex going on there. I also decided to go the route of incorporating the shock stays into the piece, similar to how some of the aftermarket ones did that sadly no longer exist. This in the end resulted in the shocks being mounted at a more severe splayed angle, as the shock stays were more inward compared to what it replaced, which means I can either use bigger offsets at the top, or mount the lower ones on the inside of my link mounts once I get my custom ones finished, which will make them much more vertical and eliminate any binding.
View attachment 126770
Managed to not lose any digits during the making of these
View attachment 126771
Preliminary mounting, making sure all lined up right. I bolted these together to do the holes, a lesson learned from failed attempt at link mounts.
View attachment 126772
Used CF tubes that I threaded as cross braces.
View attachment 126773
Wasn't really sure what to do with the actual wheelie bar wheel shaft, I had contemplated putting two of the stock ones on, or two of the little drag race ones. In the end I decided to keep the stock one in the center, and add the drag race concepts aluminum ones to the outside, to give the bar itself some protection and stability. You can kinda see the "splayed" nature of the shocks, with the top mounts now being a few mm inward and causing some minor binding at full compression. If I use the same offset size I used at the bottom, it should help, but ultimately those link mounts are getting replaced with the CF/aluminum ones I am working on, and that will move the bottoms inward enough.
View attachment 126774
There is almost no plastic left, and very little of the original Mad Crusher.