• Welcome to RCTalk! 🚀

    Join the #1 RC community where hobbyists connect, share, and get expert advice on RC cars, trucks, boats, drones, and more!

    • Friendly & passionate RC enthusiasts
    • RC tips & troubleshooting
    • Buy, sell & trade RC gear
    • Share builds & upgrades

Rock Crawl Trail build

This site may earn a commission from merchant affiliate
links, including eBay, Amazon, and others.

Senistr

RCTalk Basher
Messages
43
Reaction score
51
Points
23
Hello everyone. I am new to the crawler scene, and am extremely happy so far. I have done real life trail riding and i was in a hobby shop with my wife and I talked her into getting an RC. Ouf of the options for small scale, she picked the Axial SCX24 Deadbolt, and she let me get the SCX24 Jeep with hers! Score!

With that being said, we life in an apartment and I wanted to show her the capabilities so we grabbed boxes, Nintendo Switch casez, pillows and blankets and started having fun. Then I got a crazy idea. We have massive foam boards used for puzzles that fit 3000 piece+ puzzles and i said hey, we can make an awesome course with this as a base. Naturally she rolled her eyes and asked how much the cost and i assured her i would only spend around $100. She gave the green light and i spent all night looking up various things. Then, this morning we went shoppinng...

List :
2 x Large Home Depot packing boxes (16" x 27" x 15")
1 x 1000pc Assorted craft stick box
3 x 2.4" x 2.9" x 7.8" floral foam
4 x Aluminem Cake Pans
8 x Aluminem muffin pans
2 x Aluminem loaf pans
1 x 8" x 15' plaster wrap
1 x 16oz Hobby Tacky glue
1 x 16oz Nutmeg Brown Acrylic paint
1 x 6mm x 21.5m cotton rope
1 x 20pack foam brushes
2 x 4lbs fast setting plaster of paris
1 x bucket
2 x 1" x 11.9" x 27.9" foam sheet
2 x 1.9" x 3 9" x 11.9" foam block
1 x 0.5 cu ft Pond Pebbles (freaking heavy to carry up to the 3rd floor)

Also have additional :
4 x 3/16" thick 15" x 20" foam board
1 x 3/16" thick 22" by 28" foam board

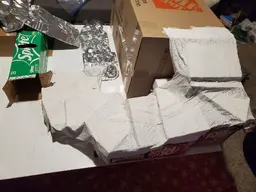
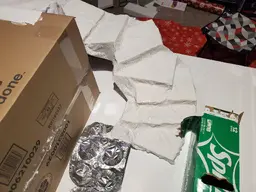
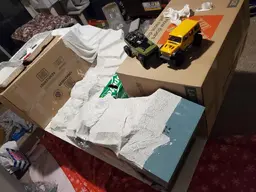
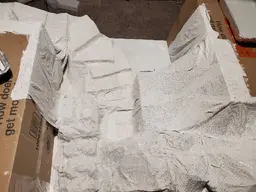
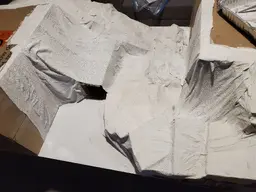
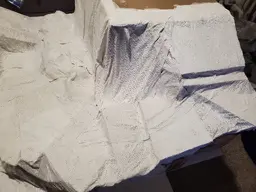
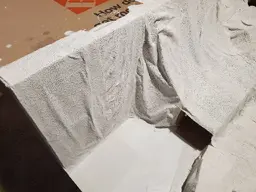
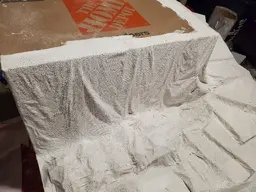
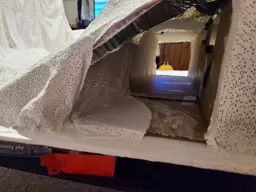
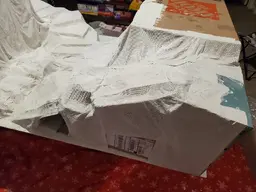
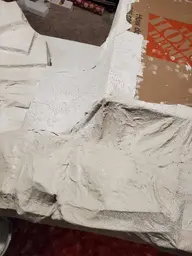
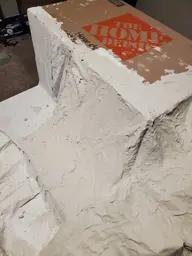
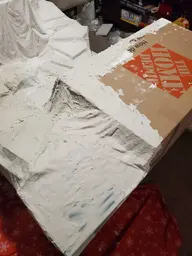
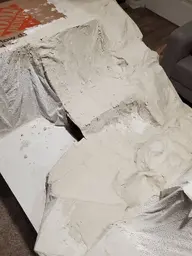
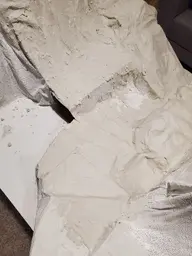
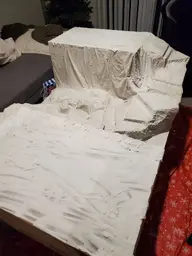
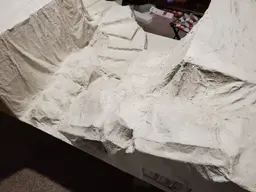
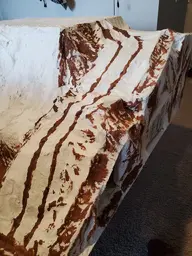
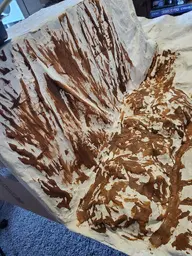
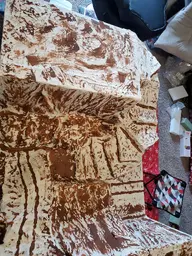
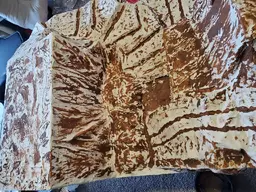
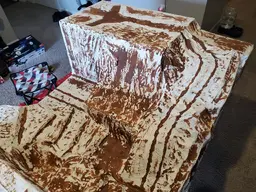
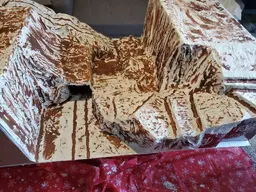
I have a few ideas on the course. The 2 large boxes might serve as 2 "mountains" with a bridge connecting them. Will try to have "steps" going up, slopes, terrain, rock path and maybe a rock wall. The base fixture will be the plaster wrap and the extra plaster to plaster the rocks into place. The goal is to keep it lightish weight to move and store as well as smaller pieces for modular designs.

Wife is at work so i have the entore living room to try and set up a crazy idea. Will try to get pictures along the way!
 
Last edited:
Do some random obstacles too, if you plan everything out sometimes it's not challenging enough. Have fun! :)
That's the plan. I am trying to pack any and everything i can onto this thing. The good thing is I have the top of the boxes too. Took me a little bit to start but i have a "dry" fit of a pattial climb on one side.
 

Attachments

  • 20220103_154901.webp
    20220103_154901.webp
    327.8 KB · Views: 99
So i used a 12 pack soda box for a makeshift tun el (wife wants a tunnep) and i had an extra one and a 24 pack box. Might use these to help with the step section on the other big box.

My idea so far is to have the slope on 1 side and the step/crawl section on the other with a bridge or two connection the 2 big boxes. Maybe one that curves under weight and another with less slack for an easier crossing. I am not planning on adding safety rails though so you have to make sure to drive straight. Not sure how i would make a technical bridge unless i custom made one with all the craft sticks. Which is an option since the box had 1000 pieces haha. Right now i have the 2 large foam sheets to measure and break. I'm thinking of doing it in 9ish " breaks and maybe just snap in half for more pieces. Should give me 6 pieces, 12 all together.
Here is a dry fit of the step course. Before i glue pieces in place, should this be good? These things are stock still and i know the plaster wrap will help anchor and smooth some of this. I plan for a steep hill going up too, maybe. Any thoughts would be appreciated.
 

Attachments

  • 20220103_170157.webp
    20220103_170157.webp
    229.3 KB · Views: 100
Last edited:
Your going to need a live bansai tree and a running waterfall! ;) OK, maybe not that practical, but it would be cool, looks good!

I just got an order of plaster wraps in this week. :)
 
So i have everything glued/taped into position. The wife might kill me for this next part. But I cleared off our coffee table and slowly and carefully put the foamboard ontop. Well. I actually stuck 2 popcorn bins under each side, then used the leverage to slide it up the rest of the way. I wanted it off the ground so i can easily move a tablecloth underneath and possibly get the plaster cloth to the underside to help fasten it.

Next step, keep cats off of the thing, get the cloth underneath and pull out the plaster wrap and carefully start molding! Ill try to get pics as i go.
 

Attachments

  • 20220103_180923.webp
    20220103_180923.webp
    110.7 KB · Views: 113
Looks like a really nice setup for the SCX24's. Can't wait to see the finished product!
 
Welcome to the tiny crawlers club!

These SCX24s are fantastic crawling machines! They do pretty well straight out of the box, but a couple of simple mods will dramatically improve it's performance.
My recommendations:
Add brass wheel weights which will significantly lower the center of gravity. They can be had for about $12-$15 on Amazon.
Remove the shock springs, and just run the shocks without them. Don't worry, at this scale and speed, you don't really need suspension. Once again, this will lower the center of gravity.
The stock motor is weak, so all it takes are wheels that are too snug to prematurely burn out the motor. Just loosen up all the wheel nuts until there is hardly any wobbling.

We like seeing build progression threads, so keep it updated with plenty of pics.
 
So i did the steps first because i was right there. So far so good, wasn't too hard to do. Then i looked at the roll that i had left and blinked. Not too much left. So now I'm off to a craft shop about 4 miles away to pick up some more of this stuff.

I'm only doing 1 layer of plaster wrap because i have 8 lbs of plaster of paris i can cover the entire thing with once the layout is done.
 

Attachments

  • 20220103_184118.webp
    20220103_184118.webp
    193.5 KB · Views: 99
  • 20220103_184128.webp
    20220103_184128.webp
    176.4 KB · Views: 101
I run mine in the house too! 🤣🤣🤣🤣 Really cool coarse man. Can’t wait to see it in action!
 

Attachments

  • D0E9FA29-16D9-4E16-B7B5-47DB4ADFB55A.webp
    D0E9FA29-16D9-4E16-B7B5-47DB4ADFB55A.webp
    214 KB · Views: 81
Picked up 3 more rolls. Finished the bottom "valley" and did most of the hill climb. Here are the pics so far.
Forgot to hit send the last time. Oops. So here is the next progress step. I've finished 3 x 8" x 15ft rolls now, but almost done with the wrap! Need to finish making the cliff side and hide some of the left over "dead space" thats around. There isn't too much of it, but it's there. After this, i will let dry for 30 mins or so to harden up a bit more and then mix the 1st pound of plaster of paris and spread around on as much as possible. I want it to look solid and rigid.

P.S. I am trying my best but I am just an IT guy! Thank you all for the support so far. I can't wait til my wife sees this as it will be the last part of her "birthday" gift since its today.

P.S.S. The mini crawler is NOT the only thing I got her haha. I took her to her favorite local hockey team's game and we are going to a Dallas Stars game on Thursday, and she has gotten a few other things, like a 1000 piece puzzle that she will make me build for her haha.
 

Attachments

  • 20220103_195215.webp
    20220103_195215.webp
    166.4 KB · Views: 95
  • 20220103_195219.webp
    20220103_195219.webp
    190.6 KB · Views: 98
  • 20220103_201506.webp
    20220103_201506.webp
    223.3 KB · Views: 105
  • 20220103_201513.webp
    20220103_201513.webp
    330 KB · Views: 89
  • 20220103_201522.webp
    20220103_201522.webp
    251.7 KB · Views: 95
Last edited:
Alright, got the last bits i needed done and still have a little plaster wrap left. Might put 1 or 2 strips for reinforcement in a spot or two. Until then, I'm going to let it dry some and then start laying actual plaster of paris down
Picked up 3 more rolls. Finished the bottom "valley" and did most of the hill climb. Here are the pics so far.
Forgot to hit send the last time. Oops. So here is the next progress step. I've finished 3 x 8" x 15ft rolls now, but almost done with the wrap! Need to finish making the cliff side and hide some of the left over "dead space" thats around. There isn't too much of it, but it's there. After this, i will let dry for 30 mins or so to harden up a bit more and then mix the 1st pound of plaster of paris and spread around on as much as possible. I want it to look solid and rigid.

P.S. I am trying my best but I am just an IT guy! Thank you all for the support so far. I can't wait til my wife sees this as it will be the last part of her "birthday" gift since its today.

P.S.S. The mini crawler is NOT the only thing I got her haha. I took her to her favorite local hockey team's game and we are going to a Dallas Stars game on Thursday, and she has gotten a few other things, like a 1000 piece puzzle that she will make me build for her haha.
 

Attachments

  • 20220103_210647.webp
    20220103_210647.webp
    330.9 KB · Views: 78
  • 20220103_210643.webp
    20220103_210643.webp
    313.5 KB · Views: 76
  • 20220103_210635.webp
    20220103_210635.webp
    288.1 KB · Views: 87
  • 20220103_210631.webp
    20220103_210631.webp
    382.8 KB · Views: 104
  • 20220103_210627.webp
    20220103_210627.webp
    420.1 KB · Views: 85
  • 20220103_210621.webp
    20220103_210621.webp
    86.2 KB · Views: 77
  • 20220103_210617.webp
    20220103_210617.webp
    177.5 KB · Views: 81
  • 20220103_210613.webp
    20220103_210613.webp
    193.2 KB · Views: 98
1st pound of plaster done...More to come!
Round 2 of plaster...
 

Attachments

  • 20220103_222606.webp
    20220103_222606.webp
    180.3 KB · Views: 85
  • 20220103_222601.webp
    20220103_222601.webp
    236 KB · Views: 87
  • 20220103_224413.webp
    20220103_224413.webp
    130.9 KB · Views: 79
  • 20220103_224418.webp
    20220103_224418.webp
    125 KB · Views: 84
Last edited:
Round 3 done
 

Attachments

  • 20220103_230906.webp
    20220103_230906.webp
    192.8 KB · Views: 83
  • 20220103_230902.webp
    20220103_230902.webp
    172.4 KB · Views: 91
So phase 1 is finally done. I used roughly 6 pounds of plaster to get everything mostly covered. I didn't really have any tools so i mixed it by hand and scooped/splashed most of it into place. I think it looks interesting and uneven this way and 99% of the holes from the plaster wrap and surface was able to be covered. So I am going to let this cure while I sleep before doing some painting.

Time of completion for phase 1 : 0230
 

Attachments

  • 20220104_021940.webp
    20220104_021940.webp
    98.3 KB · Views: 87
  • 20220104_021949.webp
    20220104_021949.webp
    130.4 KB · Views: 82
  • 20220104_022002.webp
    20220104_022002.webp
    113.4 KB · Views: 76
Morning everyone. The plaster dried pretty good overnight. I looked around and was pretty happy with it. I snagged one of the SCX24s and immidiately stuck it on the rocky humps below. It was able to go up the steep hills to the top, turn around and come baxk down. Score!

So next i tried the step course. The batteries on the Wrangler died so i snagged my wife's Deadbolt and pushed on. It slowly crawled up each step, carefully took the next turn and tried to push on. I wiggled it side to side and got to the last few steps on a deadly small turn. The cat on the cat tree staring at me, meowing as my wife got readt for work. The tiny servo's whirring away as the crawler slowly turned and with a good pop of acceleration, made it up the steps!

Going down the steps was just a flat out fail due to the steep slope and the high center of gravity. With a smile on my face, i got a plastic bowl out and a foam brush. Here is what I've done so far!
Not sure why my phone doesn't like fully posting but i finished painting. Since my wife bought some spray on snow to out on here, and how white the plaster was, i figured id keep it a winter trail look. My time living in Colorado near Pikes Peak reminded me of how the mountains can be in snow, like this uneven master piece. So, here is the final paint laydown.
 

Attachments

  • 20220104_121015.webp
    20220104_121015.webp
    202 KB · Views: 87
  • 20220104_121008.webp
    20220104_121008.webp
    337.3 KB · Views: 81
  • 20220104_125803.webp
    20220104_125803.webp
    452.4 KB · Views: 87
  • 20220104_125811.webp
    20220104_125811.webp
    448.6 KB · Views: 83
  • 20220104_125819.webp
    20220104_125819.webp
    368.5 KB · Views: 81
  • 20220104_125831.webp
    20220104_125831.webp
    394.5 KB · Views: 79
Last edited:
So now the paint is dry and I'e tested the course a little, I'm at a crossroads. With the nature of this and the scale and trying to keep it looking somewhat real, I'm trying to decide if i want to make a bridge with craft sticks, or try to go find actual sticks. Any thoughts?
 
Back
Top