• Welcome to RCTalk! 🚀

    Join the #1 RC community where hobbyists connect, share, and get expert advice on RC cars, trucks, boats, drones, and more!

    • Friendly & passionate RC enthusiasts
    • RC tips & troubleshooting
    • Buy, sell & trade RC gear
    • Share builds & upgrades

Rock Crawl Trail build

This site may earn a commission from merchant affiliate
links, including eBay, Amazon, and others.
I'd go with the craft sticks, you can cut them to whatever width you prefer. You made pretty fast work of it!
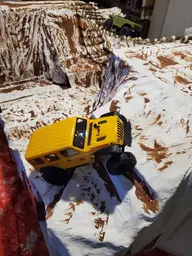
Thanx. Yeah i made sure to do all the plaster work before i slept because it was the majority of the work. While waiting for replies i noticed a down branch directly under my balcony so i ran down to snap a few sticks off. The gap is about 30" across, with a small give on each side. 6" long "logs" would be plenty wide for the SCX24. The tire from side to side is 2.5" so i can get away with 1" gaps between "logs."

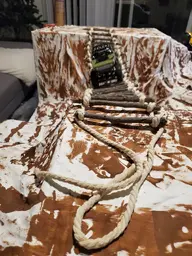
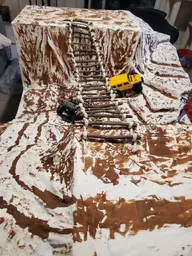
My theory is to grab a knife and cut away as much of the knots and extea small stick points and see if i have enough to make at least 30 "planks". If i can, I'm going to give maybe an inch scrap on the first roped plank and wrap the rope around the end of the stick, gluing it down, and continuing for extra support so it looks close to a realistic rope bridge.
So, like an idiot i out my pocket knife in my lap and used some scissors on a stick. Needless to say i have a good little cut but nothing some gauze and scotch tape couldnt fix. Not sure if that shows me being a redneck, or my time in the US Army...but needless to say, I'm going to be a bit more careful now.
 
Last edited:
Well I was stubborn and only the one cut to myself but I got it done. Its not completely finished but the bridge is hung. Need to make sure its 100% secured, cut extras off and lay some more glue in the joints so it doesn't fall apart.
 

Attachments

  • 20220104_201017.webp
    20220104_201017.webp
    292.7 KB · Views: 92
  • 20220104_201022.webp
    20220104_201022.webp
    177.9 KB · Views: 88
  • 20220104_201034.webp
    20220104_201034.webp
    333 KB · Views: 94
  • 20220104_201039.webp
    20220104_201039.webp
    183.2 KB · Views: 101
So after I got home from work I checked the glue and glue marks where the small tack nails were driven into the rope and everything was dried. I put a few handful of rocks into my rock pit areas and I used my wife's Deadbolt for the test runs because it still had some battery life and mine is currently charging. So, here are the results!

While driving the rocks, I enjoyed how slippery they were with the dust and stuff straight out of the bag and not securing them ment they wobbled, much like what could happen in real life. The Deadbolt struggled some but eventually navigated both rock pits. The only problem it had was going from the rock pit to the slope course which can be because of the lack of rocks, the smoothish surface of the course, or because of the lack of torque with the hard tires. Overall, I call it a success!

Onto the rope bridge... the first run was from slope side to step side. The crawler easily crawled onto the forst set of logs and carefully crawled log by log. There was minimum sway and not too much left to riht motion which was releaving. The stock weight of the crawler made it to where there was a nice amount of slack, but not too much to where the SCX24 couldn't make it back up. Once across I turned it around, carefully navigatong the box and ran it the other way. The first attempt was a fail due to not being able to keep the angle as I crossed and with 1 tire off, i tried to back up and go forward and fell off. The 2nd attempt, it went perfectly and had just enough clearance to make it all the way across!

Overall, I call this a success and am very happy with how everything looks and feels. And, with everything completed, I am having to shoo my cats away who think this is for them now. The ultimate test will be if this thing can be taken off the table amd moved without completely breaking. Not sure what will happen, but my wife does want her coffee table back and some mild clean up, as well as I said we could store this in a corner somewhere. It'll either be a success or a complete disaster. Whichever the case, I am extremely happy with this and can't wait to start making craft stick obstacles!
 

Attachments

  • 20220105_193352.webp
    20220105_193352.webp
    402.6 KB · Views: 88
  • 20220105_193400.webp
    20220105_193400.webp
    209.4 KB · Views: 93
  • 20220105_193414.webp
    20220105_193414.webp
    277.2 KB · Views: 86
I got it to the floor and noticed the plaster cracking in some spots, but didnt completely break! So after my battery was charged, it was time to play....here's a short video, hope you enjoy!

 
Woah, bigfoot is a feline. :eek:
Looks awesome bro. Nice job.
Haha yeah, thats my chubby kitten Lady Grey. Her and Grimm will get on it but the ither pays it no attention. I didn't realize she tried to eat the bridge unil i watched the video haha. Thank you though, it was fun to see it together and to make a full run with the tunnel. Now, i meed my wife to find her hot glue gun for craft stick obstackles...or use the glue...hmm
 
Back
Top