
Navigation
Install the app
How to install the app on iOS
Follow along with the video below to see how to install our site as a web app on your home screen.
Note: This feature may not be available in some browsers.
More options
Style variation
-
Welcome to RCTalk! 🚀
Join the #1 RC community where hobbyists connect, share, and get expert advice on RC cars, trucks, boats, drones, and more!
- ✓ Friendly & passionate RC enthusiasts
- ✓ RC tips & troubleshooting
- ✓ Buy, sell & trade RC gear
- ✓ Share builds & upgrades
You are using an out of date browser. It may not display this or other websites correctly.
You should upgrade or use an alternative browser.
You should upgrade or use an alternative browser.
Restoration Project #8 - Huge Bundle of HPI, Kyosho and HSP.
- Thread starter gandalfnz
- Start date
This site may earn a commission from merchant affiliate
links, including eBay, Amazon, and others.
links, including eBay, Amazon, and others.
- Messages
- 19,394
- Reaction score
- 911
- Points
- 2,075
- Location
- Central Florida
- RC Driving Style
- Bashing
- Racing
Super clean, very nice!
Doom!
Team Dust Devil
Community Leader
Lifetime Supporter!
Supporter
Excellence Award
Hospitality Award
Build Thread Contributor
RC Showcase: 6
- Messages
- 18,373
- Reaction score
- 44,411
- Points
- 2,690
- Location
- Central California
- RC Driving Style
- Bashing
- Crawling
- Scale Builder
- Flying
Looks almost brand new. 
- Messages
- 12,598
- Reaction score
- 29,586
- Points
- 1,933
- Location
- Jurassic Park
- RC Driving Style
- Bashing
- Crawling
- Scale Builder
Still jealous of the score.
- Messages
- 19,394
- Reaction score
- 911
- Points
- 2,075
- Location
- Central Florida
- RC Driving Style
- Bashing
- Racing
You and me both! I love my two RS4 3 cars. Beautiful job on the resto of all of these @gandalfnzStill jealous of the score.
gandalfnz
RCTalk Addict
- Thread starter
- #27
Still jealous of the score.
You and me both! I love my two RS4 3 cars. Beautiful job on the resto of all of these @gandalfnz
Thanks Fellas.
Does anyone know if the small temp monitoring devices can still be found somewhere?
I searched all over, but nothing, not even on Aliexpress.
I think they are great for using on break ins....etc, and on a drift nitro especially, as those can easily overheat, and temps need to be monitored closely.
I just find it easier to use than a temp gun, look and see rather than point and click....
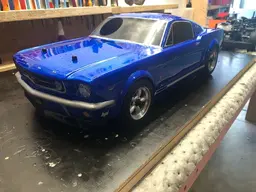
Alright, so RS3 is done as well, just needs a tune.
Only one is pending is HSP flying fish, which I am awaiting parts for.
Enjoy!
Attachments


Last edited:
tudordewolf
RCTalk Addict
- Messages
- 1,126
- Reaction score
- 1,322
- Points
- 378
- RC Driving Style
- Bashing
Here's one on amazonDoes anyone know if the small temp monitoring devices can still be found somewhere?
It might be a little large to use as a permanent feature, but for tuning it should be fine. Could probably pull the circuit board out of the housing and make it smaller that way.
gandalfnz
RCTalk Addict
- Thread starter
- #29
ThanksHere's one on amazon
It might be a little large to use as a permanent feature, but for tuning it should be fine. Could probably pull the circuit board out of the housing and make it smaller that way.
I only use them for break in, as I like to keep the engine at no less than 100C.
Otherwise I just touch the cooling head by hand and can usually guess close enough if its running too hot.
- Messages
- 19,394
- Reaction score
- 911
- Points
- 2,075
- Location
- Central Florida
- RC Driving Style
- Bashing
- Racing
Amazing job on all your restos, that looks great!
- Messages
- 12,598
- Reaction score
- 29,586
- Points
- 1,933
- Location
- Jurassic Park
- RC Driving Style
- Bashing
- Crawling
- Scale Builder
You sure this is a restore and not an unboxing? 

Great content as always. I kinda like all the blue on that one.
Great content as always. I kinda like all the blue on that one.
gandalfnz
RCTalk Addict
- Thread starter
- #33
Thanks fella!
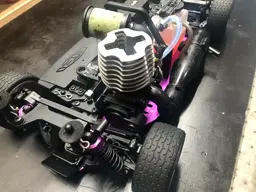
I noticed that on HSP engines, there is a gap between exhaust header and exhaust, even when you use original gasket.
Header opening is just too large.
I had the same problem on my mini cooper restoration, a while back.
Again, I had to fabricate a reducer from aluminum, hopefully there will be no leaks.


Thank you!
I have a blue anodized header on my mini cooper, and was contemplating on swapping it over....but for now, will leave it as is.
I noticed that on HSP engines, there is a gap between exhaust header and exhaust, even when you use original gasket.
Header opening is just too large.
I had the same problem on my mini cooper restoration, a while back.
Again, I had to fabricate a reducer from aluminum, hopefully there will be no leaks.
You sure this is a restore and not an unboxing?
Great content as always. I kinda like all the blue on that one.
Thank you!
I have a blue anodized header on my mini cooper, and was contemplating on swapping it over....but for now, will leave it as is.
tudordewolf
RCTalk Addict
- Messages
- 1,126
- Reaction score
- 1,322
- Points
- 378
- RC Driving Style
- Bashing
I noticed that on HSP engines, there is a gap between exhaust header and exhaust, even when you use original gasket.
Oh god, yeah. I completely forgot about that issue. It's insane to me that such a prominent flaw made it to mass production.
I dig the purple cooling head, I'm kind of itching to do an all-purple build.
The stock gasket has a flange to try and make up for the difference, but it still leaks.
I think can tell how it happens, they machine the face on the header down too much, opening up the passage too wide... probably because it's a clone of HPI's squarish manifold. The aftermarket manifolds don't have this problem.
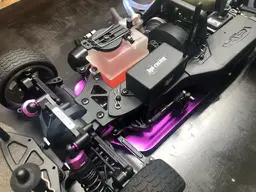
I've been meaning to get some speed posted, but it's tricky to film / hit max speed at the same time. Tumbled mine last time and took some damage, but the engine kept running even with the mounts knocked out of alignment. You can also peep the aluminum diff cases I upgraded to:
Last edited:
Doom!
Team Dust Devil
Community Leader
Lifetime Supporter!
Supporter
Excellence Award
Hospitality Award
Build Thread Contributor
RC Showcase: 6
- Messages
- 18,373
- Reaction score
- 44,411
- Points
- 2,690
- Location
- Central California
- RC Driving Style
- Bashing
- Crawling
- Scale Builder
- Flying
I don't know how you get these to where you can't tell it's not new. Amazing work.
gandalfnz
RCTalk Addict
- Thread starter
- #36
Oh god, yeah. I completely forgot about that issue. It's insane to me that such a prominent flaw made it to mass production.
I dig the purple cooling head, I'm kind of itching to do an all-purple build.
The stock gasket has a flange to try and make up for the difference, but it still leaks.
I think can tell how it happens, they machine the face on the header down too much, opening up the passage too wide... probably because it's a clone of HPI's squarish manifold. The aftermarket manifolds don't have this problem.
I've been meaning to get some speed posted, but it's tricky to film / hit max speed at the same time. Tumbled mine last time and took some damage, but the engine kept running even with the mounts knocked out of alignment. You can also peep the aluminum diff cases I upgraded to:
View attachment 151648
Looking good!
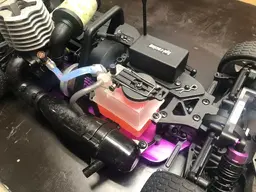
I can see quite a few upgrades you went ahead with, alu fuel cap, diff cases etc....
I have tried the same header as yours, but it still leaked, that one has a much smaller opening, I wonder if it affects peformance?
Whats that fancy analyzer RX box?
I don't know how you get these to where you can't tell it's not new. Amazing work.
Photoshop mate, just click on apply "as new filter"?
")
tudordewolf
RCTalk Addict
- Messages
- 1,126
- Reaction score
- 1,322
- Points
- 378
- RC Driving Style
- Bashing
I have tried the same header as yours, but it still leaked, that one has a much smaller opening, I wonder if it affects peformance?
Whats that fancy analyzer RX box?
Didn't seem that much smaller to me, if anything it ran/sounded better.
A SkyRC GSM020 held on with 3M double-lock. It has both "Track" and "Drag" modes to measure top speed, distance traveled, G's of acceleration, all via bluetooth app. It's tiny bit buggy sometimes but has always worked for me after a quick reset of the unit or app, and it nestles very nicely into several places on the car.
Good time to mention another mod I've done - I cut my radio tray into front and rear sections so I can remove them separately, which makes working on the transmission a lot easier because of that one tab that entangles them and makes you remove them together.... Anyway, on the C-link version they're 2 parts by default, but the pivot ball version stretched the radio tray from an L-shape into a rectangle and fused them into a single piece. Here's my split, using the original front tray which has more "meat" for the doublelock to stick to.
You could mount yours on the back of the radio tray, like this:
gandalfnz
RCTalk Addict
- Thread starter
- #38
Hey, those mods look very useful, I was thinking of just buying a cheapie skyrc gps module to measure speed.Didn't seem that much smaller to me, if anything it ran/sounded better.
A SkyRC GSM020 held on with 3M double-lock. It has both "Track" and "Drag" modes to measure top speed, distance traveled, G's of acceleration, all via bluetooth app. It's tiny bit buggy sometimes but has always worked for me after a quick reset of the unit or app, and it nestles very nicely into several places on the car.
Good time to mention another mod I've done - I cut my radio tray into front and rear sections so I can remove them separately, which makes working on the transmission a lot easier because of that one tab that entangles them and makes you remove them together.... Anyway, on the C-link version they're 2 parts by default, but the pivot ball version stretched the radio tray from an L-shape into a rectangle and fused them into a single piece. Here's my split, using the original front tray which has more "meat" for the doublelock to stick to.
You could mount yours on the back of the radio tray, like this:
I wonder if my two speed works, really itchy to find this out soon, but break in will take a bit of time.
I know on my friends HSP, both of his are not kicking into second speed.
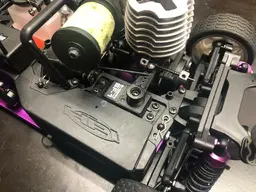
Just finished one tank, did not shut down on my once.
I am using traxxas RX and TX and telemetry, to monitor the engine temps, always want to keep it between 90 and 100C during break in.
Check out the vid.
First tank went without a hitch...
Attachments

tudordewolf
RCTalk Addict
- Messages
- 1,126
- Reaction score
- 1,322
- Points
- 378
- RC Driving Style
- Bashing
I wonder if my two speed works, really itchy to find this out soon, but break in will take a bit of time.
I know on my friends HSP, both of his are not kicking into second speed.
Mine works, but again, quirks abound. Here's a rough, bodyless video where you can hear it engaging clearly.
That break-in sounds healthy. Going back through my old videos, I realize that it is sounding a lot smoother even now than it did even after I thought I was "done" breaking it in, yours will be singing after a gallon.
The second speed gear has a pin pressed into it to catch the "claw" of the clutch; without this pin the plastic is quickly worn away after a few shifts. Replacement gears and even assembled transmissions are sold without this pin in place, I've had to press it in myself. It appears to be 2mm x 8mm, which means you can grind 2mm off one of the axle-hex pins to make one from scratch.
I've even had it work itself out, so I hammered one end flat to retain it... After that, it worked, but I can see where other people's troubles may start. They sell a metal version of the gear but it's steel and heavy af, I wouldn't want to imagine that at 15k RPM...
Last edited:
gandalfnz
RCTalk Addict
- Thread starter
- #40
You have been such great help in this last restoration!Mine works, but again, quirks abound. Here's a rough, bodyless video where you can hear it engaging clearly.
That break-in sounds healthy. Going back through my old videos, I realize that it is sounding a lot smoother even now than it did even after I thought I was "done" breaking it in, yours will be singing after a gallon.
The second speed gear has a pin pressed into it to catch the "claw" of the clutch; without this pin the plastic is quickly worn away after a few shifts. Replacement gears and even assembled transmissions are sold without this pin in place, I've had to press it in myself. It appears to be 2mm x 8mm, which means you can grind 2mm off one of the axle-hex pins to make one from scratch.
I've even had it work itself out, so I hammered one end flat to retain it... After that, it worked, but I can see where other people's troubles may start. They sell a metal version of the gear but it's steel and heavy af, I wouldn't want to imagine that at 15k RPM...
View attachment 151694
Too late for me now to see if the pin is in there?
I will have a look later if it can be seen and report back.
I saw another piece of platic, that looks like it slots into the groove, though there was something wrong, and it broke off from somewhere.
Is that how it works, it slots in there?
Similar threads
- Replies
- 3
- Views
- 175