Team Associated B74.1D 4WD Buggy build

Welcome to RCTalk

Come join other RC enthusiasts! You'll be able to discuss, share and private message with other members of our community.

This site may earn a commission from merchant affiliate
links, including eBay, Amazon, and others.
I was watching a video last night about the same kit I have. I knew I did something wrong. And I did something wrong. I had the motor mount on the wrong way and that's why the center diff did not stay in place and the bearings kept falling out. Good thing I caught it!
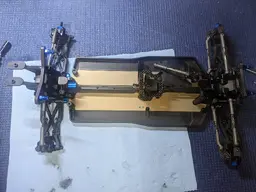
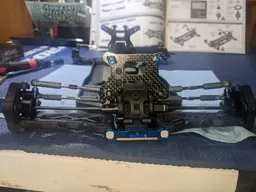
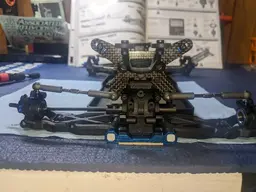
I assembled the 2-speed transmission in our Ryft, and after test running just the motor and trans assembly, it wouldn't shift right. SobI tore it apart and reassembled it. It wasn't until I tore it down the third time that I found the problem. I was baffled, and ready to chaulk it up to a bad part, or bad design. But I tore it down completely this time, piece by piece, and then I found I had the shift fork in backwards.

The shift fork was a completey symmetrical part except for a counterbore on one side that the shift arms recessed into. I had that shift arm on the wrong side of the shift fork. Had I not decided to unscrew that arm from the fork, I would never have found my error.so yeah, it happens. Especially when the build manual does not show proper views, or designate that seemingly symmetrical parts are actually non-symmetrical.
 
Way to run the problem to ground, guys. Yeah, modern build manuals leave a lot to the imagination-and subsequent unintended error.

Worst of the worst in this new lot of manuals is the Associated MT10 manual. It's like it was produced on an old 1980s first gen photocopier. All the images are black with no discernable detail. Sure a far cry from the days of the super detailed RC10T-series manuals. Flip side, the Axial SMT10 manual was highly detailed and specific as to what went where.

Best I can offer as a solution is to make pen-and-ink notations in the manual going along in the build as to how and what. And, yeah, YouTube has saved my bacon a time or two. Good luck. Hang in there. 'AC'
 
I was watching a video last night about the same kit I have. I knew I did something wrong. And I did something wrong. I had the motor mount on the wrong way and that's why the center diff did not stay in place and the bearings kept falling out. Good thing I caught it!
I have a youtube channel.
its called "Luke's Custom RCs"
 
Last edited:
I had ordered the wheels, tires, foams and other various parts like a servo horn, pinion gear, rear hexes, and a ball cup wrench. That all should be here next week. My next order will be lipo batteries. I plan to get pro match racing 2s 5000ma shorty with xt60's on the lead it comes with. Also will be getting 2 of those. I also plan to cut out and paint the body this weekend with the mini b body. I am using the same paints from the slash and rustler body so hopefully I don't run out of that paint. After that I plan to put electronics I already have in the car just to see how it drives.
 
Found a Traxxas servo and servo horn laying around in my spare parts bin. I will use this just go get the buggy running then I will upgrade to a faster servo. Been looking at savox, protek, tekin servos for competition electronics.
PXL_20221210_015250871.MP.jpg
 
Got a lot of parts in. Starting out with the Jconcepts Ellipse silver all around. Got all 4 wheels, rear hexes since I snapped those screws, protek motor fan, factory team 20t pinion (will gear down or up later) protek tire glue, protek ball cup wrench. I also got proline foams but the Jconcepts tires already came with inserts so I will keep the foams in my spare parts bin.

PXL_20221212_215308065.jpg


PXL_20221212_215324383.jpg


PXL_20221212_215353188.jpg


PXL_20221212_215415514.jpg


PXL_20221212_215436051.jpg
 
It was better to be known this before but figured out some of the ball cups are reverse threaded meaning to tighten it would be in the other direction. For example I had to turn right in order to tighten the ball cups on the turnbuckle.
So lefty loosy is not that. Now it's lefty tightly and righty loosy. 😂
Yeah, that is something you always want to check before assembling links. Some are turnbuckles, which can be adjusted on the car, others are standard thread on both ends and need one end disconnected to adjust.
 
Rear axles are in, those front wheels are cutting it close (just a test fit) and turnbuckles are getting done slowly. Going to stop for the night and continue tomorrow night.

PXL_20221212_234411984.jpg


PXL_20221213_003057091.jpg


PXL_20221213_003108428.jpg


PXL_20221213_003128340.jpg


PXL_20221213_003103505.jpg


PXL_20221213_022455971.jpg
 
...front wheels are cutting it close...
You can move that pivot ball back a hole to clear the wheel. It will actually speed up your steering a little, which you can adjust with the exponent on the steering channel in your radio if the steering is too quick. It's nice to see those adjustments on the tie rod arm.
 
i actually found another truck and it is a TLR 22-4 2.0 for 127 dollars. its a roller though. thoughts?
The TLR 22 4 is the TLRs old 4wd buggy with the belt drive system. This was the buggy before the 22X4 which is shaft driven. The belt drive systems are ok now but most racers use shaft drive now. 127 dollars and a roller. Not that bad for just a roller. The kit from TLR direct was 242 dollars. So that roller price isn't that bad. Still I would rather build a kit than get a roller. With a kit you see how the car is put together and make your own changes right out of the box. The TLR 22 4 is discontinued and the new 22 x 4 replace that car.
Still if we're to buy, find parts for it so you know you can still get parts that goes for any discontinued model. With my b74.1 they released the .2 a few weeks ago and the .2 and .1 share most of the same parts.
Got the turnbuckles done. I didn't get them to the manual states like the length between both ball cups. I just eyed it with the manual. My uncle has calipers I'm pretty sure so I will dial them in later. Tomorrow I will work on the shocks. I took out one of the rear axles because the pin near the hub kept falling out.
 

Attachments

  • PXL_20221213_030013465.jpg
    PXL_20221213_030013465.jpg
    405.3 KB · Views: 24
  • PXL_20221213_030025003.jpg
    PXL_20221213_030025003.jpg
    287.8 KB · Views: 21
  • PXL_20221213_030035386.jpg
    PXL_20221213_030035386.jpg
    294.7 KB · Views: 19
Last edited:
Looking good! You should have locking hexes on that kit right? I always put the hexes on as soon as I get the axles in. Helps keep from losing the bearings ;)
 
Looking good! You should have locking hexes on that kit right? I always put the hexes on as soon as I get the axles in. Helps keep from losing the bearings ;)
The kit came with hexes with a 1.5 set screw that locks on the pin. So I guess that is what you mean? Also when I installed the rear axles I think I have to much play with them. The kit did not include any shims or washers to prevent that. Even has the same amount of play with the turnbuckles on.

 
Hold on. I looked back in the manual and I guess I wasn't reading. The rears axles are 74mm and the fronts are 66mm. And I put the 66mm ones in the rear and the 74mm in the front. I'll redo that today after school. Maybe associated just put the wrong size driveshafts in the wrong bag? Or maybe it was me that can't learn how to read.
 
The kit came with hexes with a 1.5 set screw that locks on the pin. So I guess that is what you mean? Also when I installed the rear axles I think I have to much play with them. The kit did not include any shims or washers to prevent that. Even has the same amount of play with the turnbuckles on.

That is not right. Did you forget a bearing in the back of the upright? There will be one on the inside and outside of the upright. Or... are you sure you're using the right dogbones? Like are the front and rear different lengths? Once you figure that out... any excess play can be gotten rid of by inserting some of these in the outdrives at the diff end of the dogbone.
20221213_084007.jpg
 
Doesn't look like I missed bearing. The front axles are 74mm and the rears are 66mm which I got that right. I will try the o rings at the out drives.
Screenshot 2022-12-13 8.41.59 AM.png

Here is the diff box which I am pretty sure I added 2 shims on each side.
Screenshot 2022-12-13 8.48.49 AM.png

The online manual shows the rears as 66mm axles but the paper copy in the kit says to use the 74mm in the rears. Ill try to switch them to see if that works.
 
Last edited:
Back
Top