
Doom!
Team Dust Devil
Community Leader
Lifetime Supporter!
Supporter
Excellence Award
Hospitality Award
Build Thread Contributor
RC Showcase: 6
- Messages
- 18,462
- Reaction score
- 44,712
- Points
- 2,690
- Location
- Central California
- RC Driving Style
- Bashing
- Crawling
- Scale Builder
- Flying
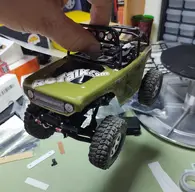
This mod is for those of you who don't like fiddling around with body clips.
1st of all I can't take credit for this idea, saw it on Youtube and I apologize to the vids creator but I can't remember who it was, you know how it is, one vid links to another, then another, and so on.
First thing, you will need a few items:
1. A thin styrene sheet (about the same thickness as your vehicles body) if you pay attention sometimes this material is used in packaging and you can get it free that way if you pay attention before throwing packages away. I had styrene stock here already. You don't need much for this project.
2. Superglue
3. Two sided tape, I use tape for electronics, such as holding cellphone screens in place. Very good stuff and rated for high temps.
4. An Xacto knife or similar cutting tool.
5. A small neodymium magnet (rare earth magnet)
6. A small thin steel washer
STEP 1: CUT AND PREP STYRENE
I cut thin strips of styrene - 2 pieces of equal size. Sorry, I didn't measure anything, just eyeball it, that's how I roll.
Once you cut the styrene, one piece will get two holes drilled in it. I placed the styrene inside the body, took a pencil and marked where the holes will go. Then I drilled the holes with my dremel tool, the holes need to be big enough to fit over the body mount pegs. This piece will sit on those pegs making a bridge between them.
The next piece of styrene will be for the body. For this one you want to attach the two sided tape to one side and stick it to the body where the body mount holes are. Be careful not to place tape directly under the holes or dirt and debris will stick to it.

STEP 2: ATTACH BOTTOM STRIP OF STYRENE TO MOUNTING PINS
This is the piece of styrene with the holes drilled in it. Before attaching, lower the mounting pegs as low as they can go. Then place styrene strip over pins and lock in place with body clips the same as you would when clipping the body shut only without the body.

STEP 3: THE MAGNET PART OF THE PROGRAM
This is where we superglue the magnet and washer in place. First I superglue the magnet in place in the center of the bridge we made. Once the super glue is dry I place the washer on the magnet so it is centered. I carefully apply super glue to the top of the washer, (you can use a toothpick for this) careful not to let it get on the magnet, you do not want to glue the washer to the magnet. While the glue is still wet, close the body, it should sit on the washer. Once the glue dries the washer will stick to the body.

I do it this way because it is the easiest way to ensure the washer and magnet line up.

Some of you may be wondering why we needed the top plate and didn't just glue the washer directly to the body. Well I'm glad you asked, the reason for taping the plate to the body is that superglue can damage the paint and leave visible discoloring seen from the outside. By taping the plate on it gives you a protective layer.
I know, this wasn't the best tutorial, but honestly I wasn't thinking about it until I was halfway done or there would be more pics.
Anyhow, this mod works great and closes quite firmly. I can pick up the Deadbolt, give it a good shake and it stays closed, while still being easy enough to open, and no longer having to deal with body clips.
If you want to give it a try, and have questions, feel free to ask. As far as I know this method should work on all kinds of vehicles of the crawling or street variety.
Thanks for following along and trying to make sense of my ramblings.
1st of all I can't take credit for this idea, saw it on Youtube and I apologize to the vids creator but I can't remember who it was, you know how it is, one vid links to another, then another, and so on.
First thing, you will need a few items:
1. A thin styrene sheet (about the same thickness as your vehicles body) if you pay attention sometimes this material is used in packaging and you can get it free that way if you pay attention before throwing packages away. I had styrene stock here already. You don't need much for this project.
2. Superglue
3. Two sided tape, I use tape for electronics, such as holding cellphone screens in place. Very good stuff and rated for high temps.
4. An Xacto knife or similar cutting tool.
5. A small neodymium magnet (rare earth magnet)
6. A small thin steel washer
STEP 1: CUT AND PREP STYRENE
I cut thin strips of styrene - 2 pieces of equal size. Sorry, I didn't measure anything, just eyeball it, that's how I roll.
Once you cut the styrene, one piece will get two holes drilled in it. I placed the styrene inside the body, took a pencil and marked where the holes will go. Then I drilled the holes with my dremel tool, the holes need to be big enough to fit over the body mount pegs. This piece will sit on those pegs making a bridge between them.
The next piece of styrene will be for the body. For this one you want to attach the two sided tape to one side and stick it to the body where the body mount holes are. Be careful not to place tape directly under the holes or dirt and debris will stick to it.
STEP 2: ATTACH BOTTOM STRIP OF STYRENE TO MOUNTING PINS
This is the piece of styrene with the holes drilled in it. Before attaching, lower the mounting pegs as low as they can go. Then place styrene strip over pins and lock in place with body clips the same as you would when clipping the body shut only without the body.
STEP 3: THE MAGNET PART OF THE PROGRAM
This is where we superglue the magnet and washer in place. First I superglue the magnet in place in the center of the bridge we made. Once the super glue is dry I place the washer on the magnet so it is centered. I carefully apply super glue to the top of the washer, (you can use a toothpick for this) careful not to let it get on the magnet, you do not want to glue the washer to the magnet. While the glue is still wet, close the body, it should sit on the washer. Once the glue dries the washer will stick to the body.
I do it this way because it is the easiest way to ensure the washer and magnet line up.
Some of you may be wondering why we needed the top plate and didn't just glue the washer directly to the body. Well I'm glad you asked, the reason for taping the plate to the body is that superglue can damage the paint and leave visible discoloring seen from the outside. By taping the plate on it gives you a protective layer.
I know, this wasn't the best tutorial, but honestly I wasn't thinking about it until I was halfway done or there would be more pics.
Anyhow, this mod works great and closes quite firmly. I can pick up the Deadbolt, give it a good shake and it stays closed, while still being easy enough to open, and no longer having to deal with body clips.
If you want to give it a try, and have questions, feel free to ask. As far as I know this method should work on all kinds of vehicles of the crawling or street variety.
Thanks for following along and trying to make sense of my ramblings.
")
