I recently posted my Traxxas T-Maxx up for sale in the RC classifieds, but before I did I wanted to dress up my used T-Maxx truck. You see, being a bashing truck it had a few scratches and not all the aluminum parts wasn't the same color.
So I decided to take my multi-color aluminum pieces and make them all one color, raw aluminum. In this post I'll show how to remove anodizing from your aluminum RC parts.
Items needed to remove aluminum anodizing

- Easy-Off Heavy Duty Original Oven Cleaner (Yellow Can!). Do not get any of the other varieties.
- Glass dish or suitably sized glass tray (I used a glass oven dish)
- An old tooth brush
- Aluminum polishing compound (note: Brasso eats aluminum in bad ways).
- Well ventilated room
- Rubber gloves.
- And of course the part(s) you wish to strip.
Removing aluminum anodizing
Before starting, be certain you are doing this in a well ventilated area, preferably outside if at all possible:
These are some nasty fumes!
- First, start off by cleaning the aluminum RC part with some dish soap and scrub using the old tooth brush. You want to remove as much dirt and oil as possible so that the oven cleaner removes the anodizing in an even fashion.
- Next place the cleaned aluminum RC parts into the glass dish.
- Then spray a nice even coating of the oven cleaner over the parts. The parts should start to foam up and you may even see some of the aluminum anodizing starting to bleed off.
- Now just wait about 2-3 minutes then rinse the parts off thoroughly using water.Wait no more than three minutes and then rinse the parts thoroughly. You can also use the old tooth brush to help clean the parts again during the rinse process.
- Finally, repeat steps 2-4 until you have a nice raw looking piece of aluminum.
NOTE: the longer you leave the oven cleaner on, the higher the chance you will pit the aluminum.
Also, note that the metal might take on a blackened look if it takes too many baths in the oven cleaner. This slight oxidation of the metal comes off with a bit of Comet cleaner and a good scrub.
- The final step is to polish the metal until you are satisfied with its “shine”. You may not get a bright chrome-like polish without using a proper polishing wheel, polish, and buffer. What you will end up with is a good brushed aluminum look.
That's it, a simple yet effective way to remove aluminum anodizing from RC parts.
Aluminum parts after anodizing removed
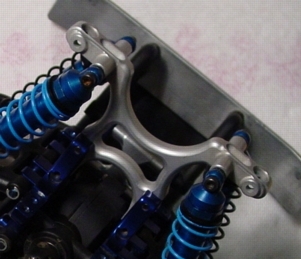
Without attempting to get a chrome shine, the parts I “stripped” of anodizing all came out with a good raw aluminum look. I did use a polish cloth to give it some shine, but the end result still looked good. I took about an hour to do a steering servo skid, two chassis braces, and the two shock towers. The T-Maxx looks much nicer in a mix of black and raw silver aluminum parts.
If the only color you can get your part in is something you would not rather put on your truck, a cheap can of oven cleaner and some time can give you a nice silver part (which goes well with any other color).
Give it a try and you might be able to save yourself the time it would take the LHS to order the part.
Here are some before and after pictures:
Before removing anodizing

After removing anodizing

Doesn't look half bad the way it is now. You can leave it the way it is and have a brush aluminum look to it or with with a little polishing the shock tower will come to a nice polish and really look sharp.
If using Easy-Off isn't your ideal way to removing aluminum anodize then check out our How To De-anodize and Polish Aluminum RC Parts guide.


