On my latest RC project I decided to de-anodize all of the aluminum parts of their purple color and reveal the bare metal finish.
Personally I like the look of bare metal better over a colored part. Many of you are familiar with the oven cleaner method of stripping off anodizing but in this article I'll cover the often talked about Greased Lightning method for those who have not used it before.
After stripping off the anodizing I will also go over one of the methods of polishing the bare aluminum part to a mirror shine.
So let's get started.
For de-anodizing you will need the following items:
- Greased Lightning Cleaner
- A few large paper clips and binder clips
- Plastic container, needs to be large enough to completely submerge your part
- Green Scotch Brite pad
- Denatured Alcohol
How to de-anodize aluminum RC parts
- First clean the anodized part thoroughly with denatured alcohol.
- Next fill your plastic container with enough Greased Lightning to completely submerge your part. For smaller parts, place an object under one end of the container and tilt it up to use less cleaner.
- Now take a straightened paper clip and hook it onto the part.
- Hang the part in the Greased Lightning Cleaner so that it is completely submerged and not touching the bottom. If you just drop the part in the Greased Lightning Cleaner, only the upper portion of the part will be de-anodized and you will have to flip the part over. While the second side is de-anodizing the first side will turn black from oxidizing. Sometimes this is inevitable with parts such as flat chassis pieces. I try to do all sides at once so there is less clean up later.
- Once the part is in the Greased Lightning Cleaner, use a binder clip to keep the paper clip secured to the side of the container.
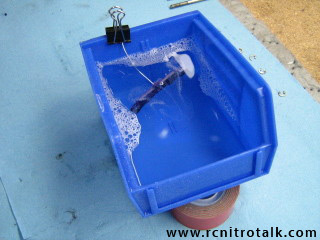
- Once the oxidizing process begins you will see bubbles start to come off the surface of the part. Check the part every minute or so. Leaving the part in for too long will cause over-oxidation and turn the part black. Depending on how thick the layer of anodizing is, it will take between 2-10 minutes to completely remove.

This piece took just under three minutes to finish.
Agitating the solution will help speed up the process. Once the part is finished rinse it thoroughly with water.
Use a Scotch Brite pad to clean up any black areas where there was over-oxidation of the aluminum. The bare metal will have a flat dull finish.
Polishing aluminum RC parts
Items needed will be:
- Wet/dry sandpaper in 320, 400, 600, 800, 1000, 1500 grit.
- Spray bottle of water
- Aluminum polish, in this example I used Blue Magic, but there are many other brands that will work.
- Dremel tool and felt polishing wheels/cones
- Safety glasses, respirator mask, and gloves.
- Red Tripoli polishing compound
- Optional: Firm cloth polishing wheel, the type that attaches to a bench grinder or drill.
First step is to wet sand your part. Start with the 320 grit sandpaper and sand in one direction for flat pieces.
If you have a curved piece you can sand in 90 degree rotations with each step in grit. Spray the part and sandpaper often with water while sanding to prevent clogging. Clogging will cause deep scratches.
Once the part is as smooth as you can get with the 320 grit, move on to 400 grit. At this point if you have the cloth polishing wheel and red tripoli you can skip moving up in sandpaper grits. Otherwise keep moving up in grit until you get to 1500. After sanding with 1500 grit paper, the surface should feel very smooth.
The red tripoli gets its red color from its active component which is rust. Polishing with this compound will remove the light surface scratches left over from sanding with the 400 grit paper and is considered a “heavy cut” type of polishing. After applying the red tripoli to the polishing wheel, lightly pass the part over the wheel until all surface scratches are removed. There is no need to press very hard on the wheel, let the wheel do the work. When you are finished the surface finish will be as smooth as if you had just finished sanding with 1500 grit sandpaper.
Now onto the fun part. Apply some polish to the part and work with a small area at a time. I use a q-tip to evenly spread the polish. Using the felt wheel and Dremel, start polishing the part using light pressure.
Let the wheel do the work and watch out for the edges of the part where the wheel could snag and fling the part from your hands. The polish should start to turn black. Keep polishing until you see the shine come through. Use a low to medium speed on the Dremel to prevent burning of the polish. When finished with polishing, use Windex to remove any excess polish.
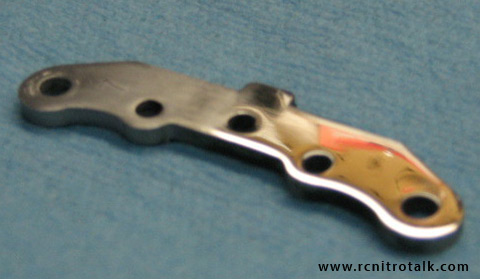
I only did half of the part to show before and after final polishing. You can use automotive wax to help keep the shine. Total time to polish this part was about an hour. It is quite time consuming but the end results will be well worth the effort.
Thanks to forum member sweetdiesel for taking the time to write this how-to. Feel free to discuss this how-to in our Reviews/How-to's forum.
What Do You Think?
There you have it: an easy way to de-anodize and polish your aluminum RC parts.
Now we’d like to hear from you.
What parts have you de-anodized?
Do you have another method of removing aluminum anodization?
Let me know by leaving a comment below right now.