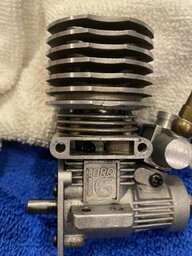
Once you take it apart and put it back together you'll wonder why you nervous about taking it apart in the first place. Theyre typically not to hard to take apart and put back togetherThis weekend I'm going to disassemble my GX-15 piece by piece, my brother will be by my side to supervise me
Navigation
Install the app
How to install the app on iOS
Follow along with the video below to see how to install our site as a web app on your home screen.
Note: This feature may not be available in some browsers.
More options
You are using an out of date browser. It may not display this or other websites correctly.
You should upgrade or use an alternative browser.
You should upgrade or use an alternative browser.
This site may earn a commission from merchant affiliate
links, including eBay, Amazon, and others.
links, including eBay, Amazon, and others.
More options
Who Replied?When I disassemble, I'm here to leave my testimony of what it was like to disassemble and assemble the engine. But thank you for your strength.Once you take it apart and put it back together you'll wonder why you nervous about taking it apart in the first place. Theyre typically not to hard to take apart and put back together
zfryes
RC Newbie
- Messages
- 2
- Reaction score
- 0
Which way does that piston go back in. Should the large hole show up in the exhaust port? See photoUPDATE ON THE DURATRAX MAXIMUM MT RESTORATION
PARTS CLEANING
This was one of the worst kept RCs I've seen. With sheet rock screws and finish nails as hinge pins.
So I stripped it down to bare chassis every screw and plastic piece..IN ORIGINALPOST.. Then put all plastis in a container with simple green. And soaked for a few days. Then dumped out and then WD-40 and SG together for a day.
All the aluminum were thrown in a container with white vinegar. And sat in there for about 30 mins. The torq .16 engine was broken down into pieces as well.. then cleaned with simple green. The shocks were also stripped down oil dumped and bodies cleaned.
To my surprise the engine didn't look to bad. Will rebuild it see if it fires.. ordered a bunch of parts for it as extra parts.. So this is were I'm at now. Almost ready to rebuild..this is how it's looking so far.
View attachment 132070View attachment 132067View attachment 132066
View attachment 132069Once the aluminum was taken out. The aluminum will most like turn black or discolored. At that time used dremel. To buff out the aluminum parts to bring back it's shine
View attachment 132071View attachment 132073
Then took all screws put them in white vinegar for about 15mins. Then put them in a container with . BLASTER DRY LUBE. Then with demel wire wheeled every screw.
View attachment 132075
Broke down shock drain oil out cleaned bodies. And the interior with a q-tip..View attachment 132076
View attachment 132077
The bearing in SG then blown out with air compressor. Then put into dry LUBE to soak. Then taken out and cleaned with microfiber cloth
View attachment 132078
ThaView attachment 132080
After breaking it down. And freeing
up the crankshaft with heat gun. Then the engine was cleaned with SG and wire wheeled. And polished.View attachment 132081View attachment 132082View attachment 132083
Now to wait for other parts to come in and the rebuild will begin. Hope the above can help anyone. That would like to break down and clean thier own RC....


