
Navigation
Install the app
How to install the app on iOS
Follow along with the video below to see how to install our site as a web app on your home screen.
Note: This feature may not be available in some browsers.
More options
Style variation
-
Welcome to RCTalk! 🚀
Join the #1 RC community where hobbyists connect, share, and get expert advice on RC cars, trucks, boats, drones, and more!
- ✓ Friendly & passionate RC enthusiasts
- ✓ RC tips & troubleshooting
- ✓ Buy, sell & trade RC gear
- ✓ Share builds & upgrades
You are using an out of date browser. It may not display this or other websites correctly.
You should upgrade or use an alternative browser.
You should upgrade or use an alternative browser.
DR10 1967 Mustang no prep build
- Thread starter Iowa crawler
- Start date
This site may earn a commission from merchant affiliate
links, including eBay, Amazon, and others.
links, including eBay, Amazon, and others.

- Messages
- 1,628
- Reaction score
- 3,078
- Points
- 1,010
- RC Driving Style
- Racing
That's a great concept!
- Messages
- 1,548
- Reaction score
- 2,836
- Points
- 520
- Location
- Iowa
- RC Driving Style
- Racing
- Crawling
- Scale Builder
- Flying
- Thread starter
- #163
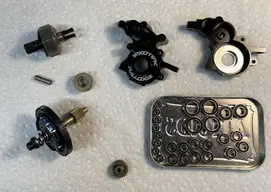
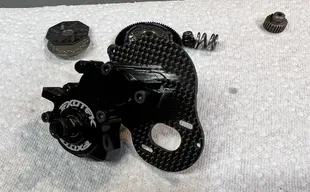
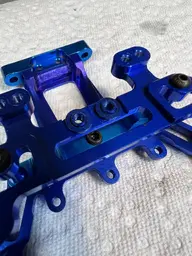
I got the Ecotek transmission case and a bag of Fast Eddie bearings today.
The bearings are the regular sealed bearing a and are always better than the factory ones that come with a kit.
The transmission is a thing of beauty. And with all metal gears and a carbon fiber motor plate it should be ready to put the power down.
Except It does not fit!
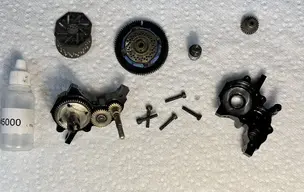
Now when you are dealing with three different manufacturers all building parts and not talking to each other thing happen.
So I have a Associated design that drag race concepts used to build there chassis kit after.
Ecotek is actually in competition with Drag Race Concepts but everyone is building off the DR10 platform. Everything fits the DR 10 but not everything fits each other.
I had to first remove some material in the chassis to get the trans to nest into the bolt cradle. Then there are shims to level out the mounting posts that hold the front of the trans.
Next I had to move the hole center rearward about 2 mm so all the bolts line up.
And a small countersink so it all snaps together after repairing the blue anodizing with a sharpie.
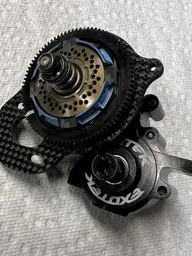
It is all going back together from here and it will be the real build with lock tight and grease in appropriate places
The bearings are the regular sealed bearing a and are always better than the factory ones that come with a kit.
The transmission is a thing of beauty. And with all metal gears and a carbon fiber motor plate it should be ready to put the power down.
Except It does not fit!
Now when you are dealing with three different manufacturers all building parts and not talking to each other thing happen.
So I have a Associated design that drag race concepts used to build there chassis kit after.
Ecotek is actually in competition with Drag Race Concepts but everyone is building off the DR10 platform. Everything fits the DR 10 but not everything fits each other.
I had to first remove some material in the chassis to get the trans to nest into the bolt cradle. Then there are shims to level out the mounting posts that hold the front of the trans.
Next I had to move the hole center rearward about 2 mm so all the bolts line up.
And a small countersink so it all snaps together after repairing the blue anodizing with a sharpie.
It is all going back together from here and it will be the real build with lock tight and grease in appropriate places
Attachments
-
 1610DA39-0687-45A5-9632-828C3E1A29B9.webp249.9 KB · Views: 118
 -
 985244BD-5519-494F-98C7-459B24D9840D.webp242.2 KB · Views: 104
 -
 3C0FC0FB-2A97-49AD-8C60-323367A3CF73.webp178.2 KB · Views: 101
 -
 32A41252-6F3F-4FF3-921B-FEBB533EF7CE.webp172.4 KB · Views: 112
 -
 08420666-E5E3-450A-94C3-1CCBC91E8313.webp120.4 KB · Views: 100
 -
 4C1D1CF3-733F-4891-9CC6-3B3B6580FF2F.webp184.6 KB · Views: 105
 -
 01FBEE76-8C49-4C48-8392-E273B913AE98.webp166.8 KB · Views: 109
 -
 253F7B04-568B-46E5-9880-32CA435EE4F7.webp141.3 KB · Views: 117
- Messages
- 1,628
- Reaction score
- 3,078
- Points
- 1,010
- RC Driving Style
- Racing
Great looking build!
- Messages
- 1,548
- Reaction score
- 2,836
- Points
- 520
- Location
- Iowa
- RC Driving Style
- Racing
- Crawling
- Scale Builder
- Flying
- Thread starter
- #166
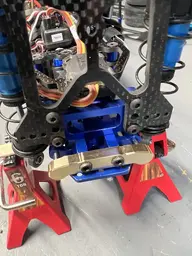
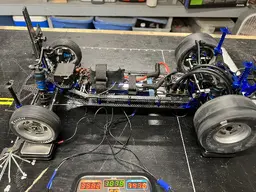
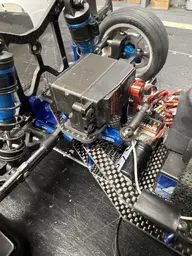
Couple little things tonight. I soldered in a 3 cell capacitor.
And I got a front suspension brace. It’s brass, not looking to weight the front but it’s not a bad place for it I guess.
And I got a front suspension brace. It’s brass, not looking to weight the front but it’s not a bad place for it I guess.
Attachments


- Messages
- 1,548
- Reaction score
- 2,836
- Points
- 520
- Location
- Iowa
- RC Driving Style
- Racing
- Crawling
- Scale Builder
- Flying
- Thread starter
- #167
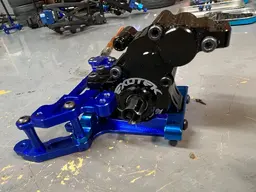
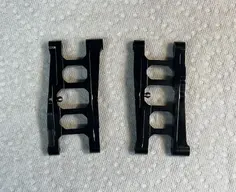
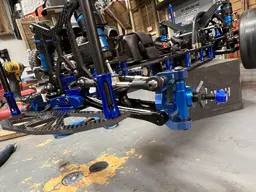
I got the lower control arms in and assembled the rear suspension. I did have to sand the anodizing off one side of a rear hub. Other than that it went together and moves very smooth.
Like a 60 mph Swiss watch.
I put it on my suspension plate with just the rear and it is nice and straight with about 2 deg of toe total.
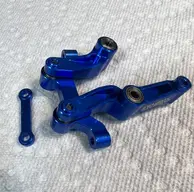
And the front bellcranks are in. The alloy bell crank with that dog bone piece is hard to find.
Still waiting for parts to get the front end together.
Like a 60 mph Swiss watch.
I put it on my suspension plate with just the rear and it is nice and straight with about 2 deg of toe total.
And the front bellcranks are in. The alloy bell crank with that dog bone piece is hard to find.
Still waiting for parts to get the front end together.
Attachments
-
 5C4419CD-5030-40CE-A265-696873AF1933.webp254.9 KB · Views: 95
 -
 BC6BD648-0B95-4F2C-A2F1-B515DDA68028.webp212.4 KB · Views: 102
 -
 B0A02187-3578-4FBD-BF88-374A1CBAEB10.webp108.8 KB · Views: 100
 -
 40CB8900-FBFB-423A-A1BD-1D377B8637D9.webp247.2 KB · Views: 104
 -
 27B53988-4852-4E8D-8DF7-0CE13A465220.webp166.6 KB · Views: 98
 -
 53405A41-0FFF-4864-9E09-1C1E672973E5.webp224.5 KB · Views: 96
 -
 C5BC045E-8B43-4C2B-A614-1B08DFF0EFA9.webp316.5 KB · Views: 108
Last edited:
- Messages
- 1,548
- Reaction score
- 2,836
- Points
- 520
- Location
- Iowa
- RC Driving Style
- Racing
- Crawling
- Scale Builder
- Flying
- Thread starter
- #168
I had to do a late night in the shop. The capacitor for this is bigger than some battery packs. And the wires are short and thick so I really don’t have a lot of choice about it’s location. It’s more about how do I mount it.
There are two strap openings, but the forward location was to far forward. And the battery cables are kinda tight.
So I made a temporary servo mount. I need a piece of 3mm carbon fiber plate to cut a new one that’s one piece. This works fine actually.
I flipped the servo around and mounted in the location of the receiver and glitch buster.
I hate to raise my CG but the giant capacitor is doing that more than the parts location swap.
Sitting at 67/33 weight distribution and 5.25 pounds still have a couple things to finish.
Come on spring!!
Attachments
- Messages
- 1,548
- Reaction score
- 2,836
- Points
- 520
- Location
- Iowa
- RC Driving Style
- Racing
- Crawling
- Scale Builder
- Flying
- Thread starter
- #169
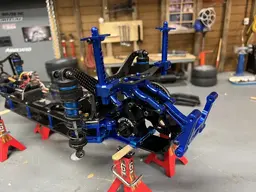
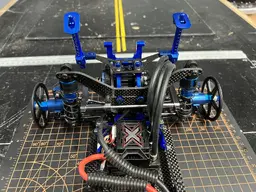
The final parts arrived today. On the one hand the build has been a blast. And I’m sad that it’s done. But I do have enough stuff left over to start on a back up car.
And really the fun is just beginning. Now I get to spend many weekend mornings doing test hits at regular places and looking for some races to pop up.
But until then I’ll just enjoy practicing and trying to make it go 2.5 seconds @ 55 mph. That s my goal.
The final parts are the lower control arms for the front as well as the C blocks.
I had to drill the front arms and fit the 1/8 inch pivot pins but they are nice a smooth now. Plus I used a trick from tuning air gun triggers. I used a piece of Lexan . A thin piece and punched a hole then cut out a washer. Now the suspension flops freely but has no play or slop. And dirt can’t get between the pieces.
Attachments
Last edited:
Doom!
Team Dust Devil
Community Leader
Lifetime Supporter!
Supporter
Excellence Award
Hospitality Award
Build Thread Contributor
RC Showcase: 6
- Messages
- 18,211
- Reaction score
- 43,924
- Points
- 2,690
- Location
- Central California
- RC Driving Style
- Bashing
- Crawling
- Scale Builder
- Flying
I enjoy watching your builds, but your really showing me how freakin' slow I get things done! 

WickedFog
Starter of too many projects. Oh look... SQUIRREL!
Community Leader
Supporter
Excellence Award
Hospitality Award
Build Thread Contributor
RC Showcase: 9
- Messages
- 28,234
- Reaction score
- 53,160
- Points
- 2,750
- Location
- Terre Haute, IN
- RC Driving Style
- Bashing
- Crawling
- Scale Builder
Wow. You have got a lot done in my brief absence.
- Messages
- 1,548
- Reaction score
- 2,836
- Points
- 520
- Location
- Iowa
- RC Driving Style
- Racing
- Crawling
- Scale Builder
- Flying
- Thread starter
- #172
Oooo the temps are going up. I can almost smell the nitro in the air. Drag racing time is almost here.
I got the latest piece of my drag racing puzzle.
The traxxas start light.
Super simple, you push the button on top to start a yellow light blinking. When the yellow light stops blinking and is illuminated solid a timer begins . Some time between 2~6 seconds after the yellow goes solid the white light turns on. That’s it. That’s all you get for $35.00
The next best thing is a whole set up for 500 bucks.
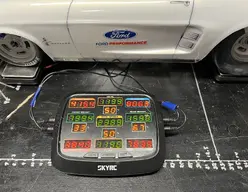
Now I still need the Sky RC GPS unit. That will tell me my 132 foot and 60 foot times.
And I need an electric leaf blower. I actually need a new weed eater so I’m looking at a Dewalt combo for that.
I have some orange flat cones to set up a track after I use the leaf blower to clean the dust. No other track prep allowed.
I found a good spot that will be perfect until summer. Because it’s a boat ramp parking lot. No one uses it in fall winter or spring.
I used google earth to measure the track length with the parking lot paint. So quick set up make a couple passes and go home. Simple and easy to test and tune.
I got the latest piece of my drag racing puzzle.
The traxxas start light.
Super simple, you push the button on top to start a yellow light blinking. When the yellow light stops blinking and is illuminated solid a timer begins . Some time between 2~6 seconds after the yellow goes solid the white light turns on. That’s it. That’s all you get for $35.00
The next best thing is a whole set up for 500 bucks.
Now I still need the Sky RC GPS unit. That will tell me my 132 foot and 60 foot times.
And I need an electric leaf blower. I actually need a new weed eater so I’m looking at a Dewalt combo for that.
I have some orange flat cones to set up a track after I use the leaf blower to clean the dust. No other track prep allowed.
I found a good spot that will be perfect until summer. Because it’s a boat ramp parking lot. No one uses it in fall winter or spring.
I used google earth to measure the track length with the parking lot paint. So quick set up make a couple passes and go home. Simple and easy to test and tune.
Attachments

WickedFog
Starter of too many projects. Oh look... SQUIRREL!
Community Leader
Supporter
Excellence Award
Hospitality Award
Build Thread Contributor
RC Showcase: 9
- Messages
- 28,234
- Reaction score
- 53,160
- Points
- 2,750
- Location
- Terre Haute, IN
- RC Driving Style
- Bashing
- Crawling
- Scale Builder
That looks like a nice fresh drag strip. They are building a Dollar General right behind me. I hope the lot is big enough we can "borrow" part of it every now and thenOooo the temps are going up. I can almost smell the nitro in the air. Drag racing time is almost here.
I got the latest piece of my drag racing puzzle.
The traxxas start light.
Super simple, you push the button on top to start a yellow light blinking. When the yellow light stops blinking and is illuminated solid a timer begins . Some time between 2~6 seconds after the yellow goes solid the white light turns on. That’s it. That’s all you get for $35.00
The next best thing is a whole set up for 500 bucks.
Now I still need the Sky RC GPS unit. That will tell me my 132 foot and 60 foot times.
And I need an electric leaf blower. I actually need a new weed eater so I’m looking at a Dewalt combo for that.
I have some orange flat cones to set up a track after I use the leaf blower to clean the dust. No other track prep allowed.
I found a good spot that will be perfect until summer. Because it’s a boat ramp parking lot. No one uses it in fall winter or spring.
I used google earth to measure the track length with the parking lot paint. So quick set up make a couple passes and go home. Simple and easy to test and tune.

WickedFog
Starter of too many projects. Oh look... SQUIRREL!
Community Leader
Supporter
Excellence Award
Hospitality Award
Build Thread Contributor
RC Showcase: 9
- Messages
- 28,234
- Reaction score
- 53,160
- Points
- 2,750
- Location
- Terre Haute, IN
- RC Driving Style
- Bashing
- Crawling
- Scale Builder
Nice, will have to check that out.So Associated just released the DR10m for mid motor.
I am hoping my mustang here is not obsolete before I get to run it.
- Messages
- 1,548
- Reaction score
- 2,836
- Points
- 520
- Location
- Iowa
- RC Driving Style
- Racing
- Crawling
- Scale Builder
- Flying
- Thread starter
- #176
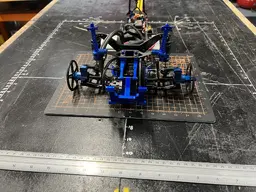
The day finally arrived!!
They have been replacing my street for the last year or so and I have a serious test pad out front I could not pass up.
I dusted off the mustang charged the batteries and warmed the tires.
The front street is two lanes with bike lanes so very wide and closes off for a mile. It’s gravel behind the camera.
I am treating this like I would a real car. Just baby steps and nothing serious. Just some test hits and stoping.
I have spent two years racing 2WD buggies and I know how to get force transferred to the tires when accelerating in dirt. This fresh concrete is covered in dust and. Stones. But it is flat and open and right out front.
So I made a pass then got the g pro and made the video. I’m waiting for the rain. I will sweep a strip and wash the street and make another.
What I was doing was getting it moving in a straight line then opening up the throttle. Super straight and easy to drive.
- Messages
- 1,891
- Reaction score
- 3,263
- Points
- 545
- Location
- Harris County, Texas
- RC Driving Style
- Bashing
- Racing
Great vid Ic. Yeah, baby steps is the way to go. One misstep at speed in RC drag racing and its curtains and soft music for the car. See it lifting the front wheels in the head-on return vids. You have the wheelie bar set low to the surface. That's a big plus.
Like the car has reverse. I've always been an advocate of radio staging in RC drag racing over hand staging the car. To me, it is more realistic and evens the playing field in favor of the better driver. Not doable for nitro, and guess for that reason it never gained favor in full-prep RC drag racing.
See the car coming back a lot on the bicycle path. Is it a better surface? Different concrete mixture? Or different surfacing? Or just easier to do? Great having a test strip out front of the house.
Two thumbs up (cause that's all I have). Cheers. 'AC'
Like the car has reverse. I've always been an advocate of radio staging in RC drag racing over hand staging the car. To me, it is more realistic and evens the playing field in favor of the better driver. Not doable for nitro, and guess for that reason it never gained favor in full-prep RC drag racing.
See the car coming back a lot on the bicycle path. Is it a better surface? Different concrete mixture? Or different surfacing? Or just easier to do? Great having a test strip out front of the house.
Two thumbs up (cause that's all I have).
Cheers. 'AC'- Messages
- 1,548
- Reaction score
- 2,836
- Points
- 520
- Location
- Iowa
- RC Driving Style
- Racing
- Crawling
- Scale Builder
- Flying
- Thread starter
- #178
Thanks the street is just a big slab of concrete. Before it had two lanes and a turn lane in the center. Now it will have two lanes with bicycle lanes at the side. It will all get separated with paint lines. But that’s after they replace the rest of the road and sidewalks.
The car has been a super shelf queen and I don’t have metal shock caps yet. There is a bunch of dust collection on the control arms from the oil. I am just gonna clean it up and refill them for now, but I think the shocks are low on oil for this video.
The car has been a super shelf queen and I don’t have metal shock caps yet. There is a bunch of dust collection on the control arms from the oil. I am just gonna clean it up and refill them for now, but I think the shocks are low on oil for this video.