A simple and inexpensive way to convert nitro to electric

Welcome to RCTalk

Come join other RC enthusiasts! You'll be able to discuss, share and private message with other members of our community.

This site may earn a commission from merchant affiliate
links, including eBay, Amazon, and others.

RC_Felix_BB

RCTalk Member
Messages
26
Reaction score
7
Hello, my name is Felix and I live in Belgium. I recently found a Nitro RC car on the side of a road. I was not interessed in investing in fuel, ignition and a pull- or other starter.
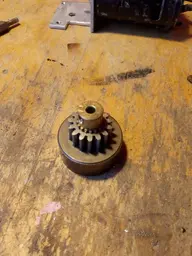
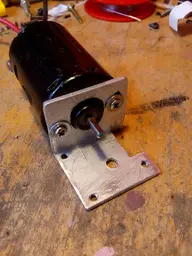
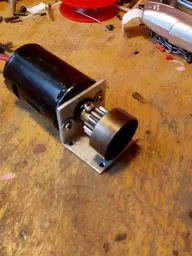
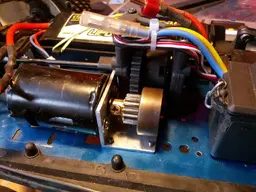
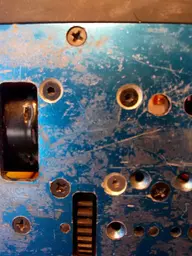
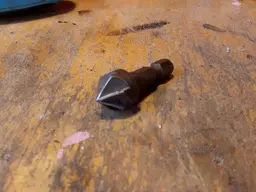
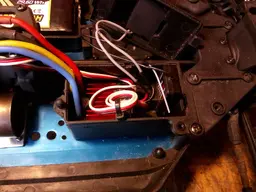
So I Came up with a solution (if you are willing to drill a few holes). What you are going to need is: an electric motor and esc (brushed or brushless), a battery (li-po or nimh), a piece of rail (bent 90°) a pinion gear (I used a brass one), a couple of bolts (m3), something to pull thread (m3) and the gear at the end of the original engine.
 
You are going to have to make 2 Parts: a pinion gear for your electric motor and a motor mount.
 
Part one: the pinion gear
Put your pinion gear on a rod and put that on a drill (or a lathe) and use a file to make the diameter almost similair to the inner diameter of the gear on the original engine. When they are almost the same size (outer diameter pinion a little bit bigger than inner diameter of original gear), line thema up to eachother and press thema into eachother with a vise as shown on the picture.
 

Attachments

  • 1618477367332836621969.jpg
    1618477367332836621969.jpg
    361.5 KB · Views: 419
Now, part two: the motor mount:
Take a piece of Paper and put a hole in it the size of the piece of the motor that stics out in the front (around 13 mm). Put this piece of Paper over this protrusion. Now you can use something pointy to punch 2 holes in the piece of Paper (where you put your bolts in). Now, take the piece of rail and cut off a piece the width of your motor. Now draw a vertical line down the Middle. On this line, from the bottom up, Mark the half of your motor's outer diameter. On this spot, drill a hole with a diameter of 14 mm for some wiggle room. Stic your motor through the rail (from the outside in) and put your piece of Paper on it on the other side. Now you can transfer the holes you had punched through the Paper. Make it so your marks are somewhat horizontal and drill 3,5 mm holes on those 2 spots. Your motor should fit nicely flush with the bottom plate. Now, drill 2,5 mm holes on all 4 corners and thread thema with m3 thread. Now, attach your motor to your rail using 2 m3 bolts and 2 washers and attach the pinion gear you pressed together earlier. Now put your rail on your chassis plate and align the two gears (pinion and Spur gear) and mark 4 spots through those threaded holes from before. Now it is time to drill 3,5 mm holes in your chassis plate. You should now ben able to attach your motor and motor mount to your chassis.
I al not responsible for any damage doen to your RC car, I al just telling you how I did it. Some photos wil follow.
 
I had to remove one corner of my motor mount to allow the Spur gear and Spur gear mount to pass. 3 screws are sturdy enough.
 

Attachments

  • 16184792069181093573646.jpg
    16184792069181093573646.jpg
    368.7 KB · Views: 163
If your pinion gear does not align properly to your Spur gear, drill out the motor holes to slide the motor more towards or away from the Spur gear.
 

Attachments

  • 16184796132641777956260.jpg
    16184796132641777956260.jpg
    375.6 KB · Views: 140
This is what mine looks like.
 

Attachments

  • 1618479673263851142208.jpg
    1618479673263851142208.jpg
    346.9 KB · Views: 234
Here it is in the car.
 

Attachments

  • 16184798220811691490108.jpg
    16184798220811691490108.jpg
    384.8 KB · Views: 1,204
I also made my screws sink into the chassis using a special bit.
 

Attachments

  • 1618479887741549788657.jpg
    1618479887741549788657.jpg
    331.7 KB · Views: 105
Now you just have to find a way to attach your electronics. I put them in this box that used to carry a Holder with 4 AA batteries.
 

Attachments

  • 1618480122084885232369.jpg
    1618480122084885232369.jpg
    253.2 KB · Views: 295
  • 1618480142686811612689.jpg
    1618480142686811612689.jpg
    334.2 KB · Views: 210
Nice job on the cheap conversion mod, Felix!
I have an old Duratrax Warhead that I plan to convert to electric, at some point in the future.
 
Nice job on the cheap conversion mod, Felix!
I have an old Duratrax Warhead that I plan to convert to electric, at some point in the future.
Thank you Bert much.
 
Just to be clear, I haven't tested this with a brushless power system yet, so I don't know if it van handle the torque. I am quite confident though.
 
Great find . I think you might want to make a support for the can of the motor so it can't bend your motor mount and then spur n pinion gear eat one another.a piece of wood with a bevel in it will do the job you can secure it with double sided tape or even glue to chassis.have fun.
special bit is called a counter sink drill bit.for metal
I made it so they motor itself sits flush to the chassis plate so I can easily make it more sturdy by attaching the motor too. Thanks for the tip. Also thanks for the name of the bit, I speak dutch and I don't even know the proper name for it (in dutch).
 
I made it so they motor itself sits flush to the chassis plate so I can easily make it more sturdy by attaching the motor too. Thanks for the tip. Also thanks for the name of the bit, I speak dutch and I don't even know the proper name for it (in dutch).
Oh, that's cool.
 
Back
Top