Benefits:
– Improved strength of the differentials
– Makes your diffs last longer
– The fluid improves traction by attempting to transfer power to both wheels at the same speed
– Improves steering capabilities
– Enhances handling and overall performance from the differentials
Parts Needed:
2 Sets – HPI Bevel Gear Set (Part # 86032)
1 Set – Kyosho Bevel Gear Shaft Set (Part # 2335) –OR– 2 Sets – OFNA Cross Pin 4.0mm 9.5 (Part # 30773)
1 Can of your Favorite Degreaser or Cleaner
1 Tube of HPI Grease (Part # Z160) –OR– Any Brand of Grease
1 or 2 Bottles of your Choice of Diff Oil (weights will be discussed below):
– Team Associated Silicone Diff Oil
– OFNA Silicone Diff Oil
– HPI Differential Gear Oil
Now it's time to decide which weight of diff oil you want to use. This is where you will have to experiment or talk to others about which weights they use. Many people use the same weight fluid for both diffs, yet others use heavier weight oils in the front diff than in the rear diff. If you use the same weight for both diffs, then 1 bottle will be enough. The main difference between the fluid weights is that the thicker diff fluid increases the ability of the gears to “lock up”. Thus, helping to give you an equal amount of power to both tires. Even if one tire is spinning in the air and the other is on the ground, the tire on the ground should also receive the same power as the tire in the air. With the old gear set-up, the tire in the air would be the only one receiving the power. Here is a simple guide for the different weights:
~ 1000 Weight Front/Rear – Good for Street & Offroad
~ 1000 Weight Front & 3000 Weight Rear – Good for Bashing & Light Racing
~ 5000 Weight Front & 3000 Weight Rear – Aggressive Bashing & Racing
~ I choose a little more extreme racing setup of 6000 Weight Front & 3000 Weight Rear. I also choose Team Associated because the viscosity is a little bit thicker than the other brands thus decreasing the chance of it dripping out of the diff case.
Directions:
As with any set of directions, there is more than one way to do things. So, use these as a guideline and use your own judgment when doing your mod. Let's begin:
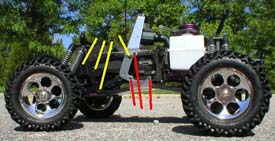
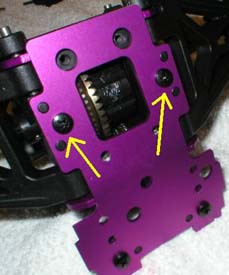
1. You will need to remove the front end of the truck by removing the following screws. There are 8 screws on the front (4 on each side). You see them below in yellow. You might also want to loosen the screws that hold the roll bar on (you don't need to remove them). You see them below in red. This will allow the front end to slide out easier.
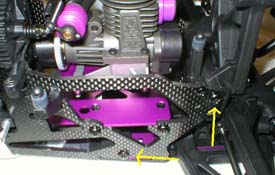
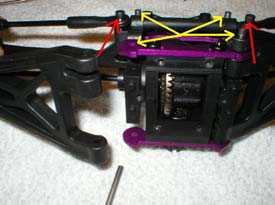
2. Now remove the fuel tank by pulling out the two body clips that attach it to the TVP. This will allow you to get to the screws to remove the rear end. Remove the 4 screws that hold the rear end in place (2 on each side). You see them below in yellow. Now you can loosen the other screws on the TVP to help slide the rear end off (you don't need to remove those screws).
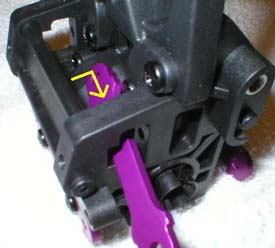
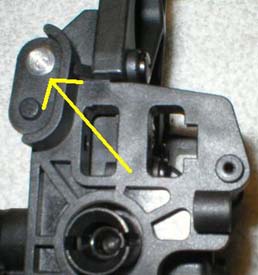
3. Now the front & rear end should be completely off the truck and it's time to remove the bottom plastic skid plate. Start by removing the two screws from the front end of the truck that attach the bumper to the bulkhead. You can see them below in yellow.
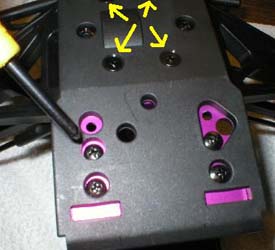
4. Flip the front end over and unscrew the 4 screws, which are in yellow. This will allow the bottom plastic skid to come off. You will need to pull down on the end by the bumper for the skid to pop off b/c the other end has a lock on it.
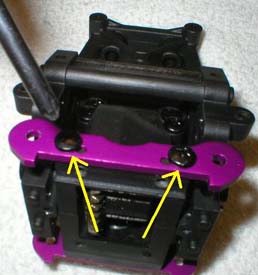
5. Next will be to remove the aluminum skid plate by unscrewing the 2 screws in yellow. The plate should pop off once those screws are removed.
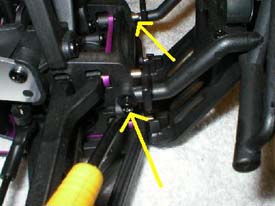
6. Now you can remove the 4 pins, which hold the suspension arms in place (below in yellow). These are easily removed by simply pulling them out. Once the pins are removed, you will need to unscrew the turnbuckles (below in red).
7. The aluminum upper arm brace will now pop out.
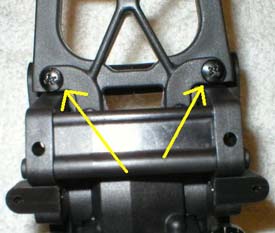
8. Now you can remove the aluminum lower arm brace by unscrewing the 2 screws (below in yellow). Make sure you remove both lower arm braces.
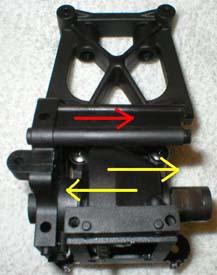
9. Next will be to remove the silver thread bar, which is in the bulkhead housing. This is easily done by pushing it out (below in yellow).
10. Now you need to remove these 2 screws (below in yellow).
11. The bulkhead housing should now split apart and come off (pull in direction of yellow arrow). There is a center plastic brace, which can be removed after one of the sidepieces is removed first (below in red). The pic already shows one of the bulkhead pieces removed.
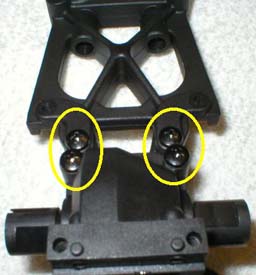
12. Now you can unscrew these 4 screws (below in yellow). This will allow you to remove the shock tower and to pop the front of the diff housing off.
- Pages:
- 1
- 2