
HMS
U.S. Army Veteran
Bought the TRX4 Black Blazer as I am a fan of the square/smooth lines of the ‘79 K5 Blazer—and that it is a low center of gravity design.
Of note, mine came with the steel servo horn installed which the dealer and I both noticed upon unboxing. That was a nice update—as my understanding was the truck had a plastic servo horn.
My goal is to keep the CG low and keep the clean look of the K5—thus my initial accessories.
My LED headlights, side markers, taillights were installed by HobbyTown Edmond when I purchased the Blazer new—which I have to tip my hat to them, as the installer owns a nice TRX4 and I appreciate that mod—which my wife and I like for driving around at night and playing with our dogs.
Today, I installed:
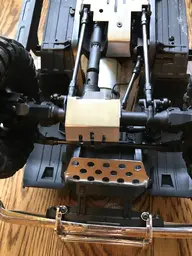
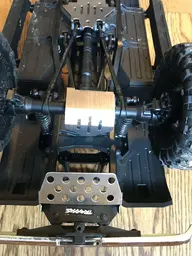
1. RC Chassis Armor Set, Stainless Steel (from Amazon): 10 minute install, the pieces are quality, plastic shrink wrapped, and fit perfectly. It came with a bag of 10 bolts—of which only 1 was necessary (but the extra bolts are nice to have in the toolbox). The diff guards and the skid plates are areas where I’ve dragged the truck. Mostly, I like that the weight is low and the truck may slide vs. hang up on the underbody. We will see.
2. Traxxas chrome push bar, which is period specific for the ‘79 K5. It adds the retro look and of course can protect the grille.
NOTE: The front/rear skid plates do mount to the steel frame of the TRX4–and are heavy gauge enough that I believe it will help with frame rigidity—slightly.
Here are a few photos.
Of note, mine came with the steel servo horn installed which the dealer and I both noticed upon unboxing. That was a nice update—as my understanding was the truck had a plastic servo horn.
My goal is to keep the CG low and keep the clean look of the K5—thus my initial accessories.
My LED headlights, side markers, taillights were installed by HobbyTown Edmond when I purchased the Blazer new—which I have to tip my hat to them, as the installer owns a nice TRX4 and I appreciate that mod—which my wife and I like for driving around at night and playing with our dogs.
Today, I installed:
1. RC Chassis Armor Set, Stainless Steel (from Amazon): 10 minute install, the pieces are quality, plastic shrink wrapped, and fit perfectly. It came with a bag of 10 bolts—of which only 1 was necessary (but the extra bolts are nice to have in the toolbox). The diff guards and the skid plates are areas where I’ve dragged the truck. Mostly, I like that the weight is low and the truck may slide vs. hang up on the underbody. We will see.
2. Traxxas chrome push bar, which is period specific for the ‘79 K5. It adds the retro look and of course can protect the grille.
NOTE: The front/rear skid plates do mount to the steel frame of the TRX4–and are heavy gauge enough that I believe it will help with frame rigidity—slightly.
Here are a few photos.
Attachments
-
 290DF6ED-8C0B-41A4-B586-C51517066B41.webp124 KB · Views: 245
 -
 0D1C65FE-71B8-48AF-8E9F-BAEAC87C613A.webp122.4 KB · Views: 110
 -
 1A33AA7F-CE72-4C2C-A428-3274765EDFDB.webp221.8 KB · Views: 173
 -
 0D9F7441-96C0-482D-9E61-339ED2A8C4B9.webp136.9 KB · Views: 174
 -
 CF0055F0-B74D-4071-B8B2-86374090BEAD.webp143.5 KB · Views: 251
 -
 F32B8FD7-B9B0-42CB-B6DB-645F351241D4.webp118.2 KB · Views: 169
