• Welcome to RCTalk! 🚀

    Join the #1 RC community where hobbyists connect, share, and get expert advice on RC cars, trucks, boats, drones, and more!

    • Friendly & passionate RC enthusiasts
    • RC tips & troubleshooting
    • Buy, sell & trade RC gear
    • Share builds & upgrades

Dremel Project

This site may earn a commission from merchant affiliate
links, including eBay, Amazon, and others.

Greywolf74

I'M TO BLAME!
Lifetime Supporter!
Supporter
Excellence Award
Hospitality Award
Build Thread Contributor RC Showcase: 8
Messages
18,623
Reaction score
14,475
Points
1,970
Location
Ohio
RC Driving Style
  1. Bashing
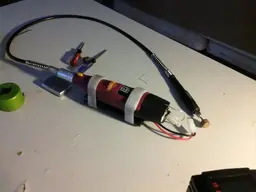
So I bought this Kawasaki brand dremel knock off from Wal-mart because it was on clearance for 80% off. Problem with it is the battery was only 700mah and the charger didnt stop charging when the battery was full so it wasn't to long before I fried the already extremely short lifespan of the battery. So I looked into repacking the battery with new higher MAH cells only to discover I couldnt get much over 900-1000mah in a 4/5AA NiCD battery so I re-wired it and made my own 2500mah battery pack which will run this dremel for about 1hr 45min on high speed. Since I only ever use the dremel at my hobby desk I just hand the dremel on the wall and velcro'd the battery to the wall beside it. Since I used deans connectors I can use my Lipo chargers to charge the battery that way it doesn't get cooked.

nwbyw4.webp

l86qf.webp

14mujyx.webp

25rntp0.webp
 
Pretty slick man!
 
I removed the 4/5AA cells from the pack. Its just a hollow shell with a nice hook for hanging it on the wall. Theres no juice in it unless its hooked up to the big battery.
 
I use it with a flexable shaft hanging from the wall next to my hobbybench. I almost never move it. Only reason I bought it is because it was 80% off. I didnt care about it being cordless. I velco'd the battery next to where it hangs on the wall and I can now use it for hours instead of 10 minutes :)
 
Hmm, is there any way you could do somewhat of a tutorial? I actually bought a cordless dremel from harbor freight (same exact thing as yours) and after 10mins of good use the pack is dead.
 
I didn't really document the process of doing it so its kind of hard to go back and make a tutorial but I'll try to briefly explain it and then if you have any questions then ask away. Basically all I did was solder a pair of wires on the terminals that used to make contact with the battery when you put it in. I took the old battery pack apart and took the cells out and threw them away. I then put the empty battery pack shell back together and then cut off the last 2-3 inches of the plastic shell to make room for the wires and then I drilled two holes in the top of the empty shell for the wires to come out of. In the middle of the wires I put a couple of 3.5mm bullet connectors in case I ever want/need to take the thing apart and then on the end of the wires I soldered a deans connector. Its all really pretty easy you shouldnt have to much trouble. The hardest part for me was figuring out how to get the battery pack apart. That envoled sticking 3 or 4 small prescion screw drivers down along the sides of the pack to hold back plastic tabs so the two halves of the pack could be separated.

As for making battery packs it really more of a PITA than its worth. You can buy just about any pack you want from this site. http://www.onlybatterypacks.com/main.asp

If you really want to make the pack they also sell all of the individual cells, insulation, caps, wire, and shrink wrap you need to make your own. Make sure you order cells with tabs because you want to solder the tabs together and dont solder on the actual cell itself. Believe me when i say that the slight extra cost of just buying a 9.6V premade pack is worth not having to hassle with it. Otherwise I just watched some tutorials on youtube on making batt packs only after talking to a couple people (one guy was from Batteries Plus and the other guy was from that website I just gave you they said you should never solder directly to the battery unless you just have no other choice because its very easy to damage the cells. Solder tab to tab. Ignore the part of the youtube vids where people are soldering directly to the cells and just learn everything else they are showing.

Theres not much to it really other than a bunch of tedious soldering. Solder four cells in a row positive to negative just like you stick in them in a row in a device. make two rows of them then I used heat shrink tubing to hold each of the 2 rows of 4 cells together then laid them side by side and soldered one positive end to one negative end. The other end is where you solder your wires. I would suggest making that end the "bottom" of the packs and running your wire the length of the pack and out the other end. this will help keep pulling a tugging forces to a minimum on the solder joints of the wires. Once you do that then you just use your bigger shrink wrap and put your insulation and cap on one end and shrink the heatshrink down around it to hold it in place and then repeat on the other end and then shrink all of your tubing along the entire length of the pack.
 
Actually went ahead and winged it :D not to hard, yours probably came out a bit cleaner. I also just have the battery Velcroed to the dremel until I find a place to hang it. But I was thinking....someone has to make a pack small enough to fit in that case, instead of just making one.
 

Attachments

  • uploadfromtaptalk1326740067732.webp
    uploadfromtaptalk1326740067732.webp
    24 KB · Views: 169
There are places that can repack the original battery with higher mah NiCDs but you can't get alot higher than the 700mah cells than are in there. I looked into it. NiCDs in the 4/5AA size only go up too about 900-1000mah tops. You can find NiMH cells higher than that but since you're powering a motor they have to be high amp draw NiMH cells and the price of those cells would have made repacking the original pack cost 4 or 5 times what the external pack cost to make.

---------- Post added at 3:31 PM ---------- Previous post was at 3:28 PM ----------

If you chose to go that route and have the original pack repacked I would cut the power wire on the charger and solder a deans ro whatever connector to it and use the original cradle to charge the pack with your good RC charger....soemthing that will shut off when the pack is full unlike the original charger. I tried this in order to cycle my original pack a few times hoping to restore some life to it. It seemed to work fine.
 
Back
Top