Atlantic Tug build/discussion

Welcome to RCTalk

Come join other RC enthusiasts! You'll be able to discuss, share and private message with other members of our community.

This site may earn a commission from merchant affiliate
links, including eBay, Amazon, and others.

JeffVC

RCTalk Rookie
Messages
15
Reaction score
35
RC Driving Style
  1. Crawling
  2. Flying
  3. Boating
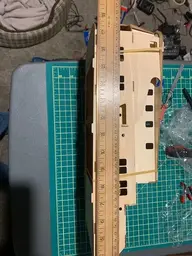
Have an Atlantic Tug by Artesania Latina , my first venture in a boat build.
I have a older battery speed boat that required assembly but not real construction.I have built planes for 30 years so not new to building.
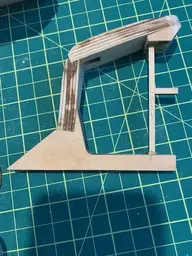
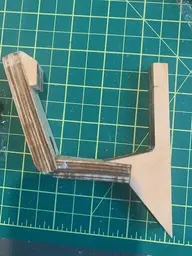
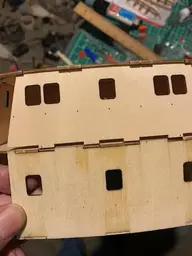
Have the interior structure assembled and squared up, not sure if required as plans only show 90 angle at join, but old habits die hard when you want a plane to fly straight.
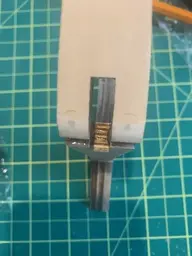
Now just have to decide what adhesive to use to attach to ABS hull with

IMG_1265.jpg


IMG_1266.jpg


IMG_1286.jpg


IMG_1287.jpg
 
Oh man... that looks like hella fun to build! Watch this one. I love wood kits!!
 
Little bit of progress on Tug.
Different build then used to as all material is light ply with different thickness. I am used to balsa where it comes to curved surfaces but a little steam and heat and fit is pretty good.
Rear deck done, front deck done and both placed for fitment on hull. Not real happy with fit, hull is way wider will have to squeeze in when gluing, might be normal as have never built a boat like this before.
Nothing is attached at this point as still working on internal control stuff, just needed placement so I can make sure all is serviceable once deck is on.

IMG_1312.jpg


IMG_1319.jpg


IMG_1320.jpg


IMG_1321.jpg

Rudder support built, did a few mods as per instructions. They had two rounded surfaces where the two pieces attached. I put a proper size support between the two then did an angle join and drilled in two dowels from top for extra support, maybe over kill as both pieces attache to hull
 

Attachments

  • IMG_1322.jpg
    IMG_1322.jpg
    115.2 KB · Views: 48
  • IMG_1310.jpg
    IMG_1310.jpg
    104.8 KB · Views: 48
  • IMG_1311.jpg
    IMG_1311.jpg
    70.3 KB · Views: 52
Better to reinforce it now and be safe, than to find out later that it needed it. Looking good. :thumbs-up:
 
Looking good. And looks like a really fun build!
 
looks good..id look into the newer thruster as a drive,its a dual function driver.(rudder and motor)
 
All I have done was glue the ribs where they made contact with decks not on, thinking I will glue that part once I am ready to attach the deck. I used a construction adhesive that gives me lots of working time.
As for the rudder, took a lot of sanding and fitting to get a fit I was happy with. I just made sure it was level and straight with the bottom of hull and then epoxied it on.
I have not drilled for the rudder or prop shaft yet as am waiting for internals before I move on.
In the mean time I did some assembly on the superstructure, I had some fitment issues with the lower and mid section, it is not easy to see but the slots are not cut level causing floor curvature, will try and post a few close ups.Also there is a part #107 which has an up/down side, good thing I did a test fit before gluing or would have had an issue, you dont really notice until you put # 108/109 in and it does not fit.
Have also started on the life rafts as they are a slow build with all the small planks, almost just traced and carved out of solid balsa as I have lots that size.
On a last note, my grandson feels the ship is the perfect size for the lego men and had to show me.

IMG_1349.jpg


IMG_1348.jpg


IMG_1350.jpg


IMG_1352.jpg


IMG_1342.jpg

As I said the superstructure has a curved lower portion, follows the deck line, but as it continues to build up it causes a slight misalign. I do not want to force to top floor down as the upper portion fits nice as it is now, will just build up the front piece with some scrap to fill in the gap.
 

Attachments

  • IMG_1353.jpg
    IMG_1353.jpg
    80 KB · Views: 40
  • IMG_1354.jpg
    IMG_1354.jpg
    82.4 KB · Views: 39
  • IMG_1355.jpg
    IMG_1355.jpg
    64.5 KB · Views: 43
Last edited:
Cool. I can only observe. Because I’m pretty sure I couldn’t build that kit so it all lined up straight even to save my life. An RC car kit, yeah. This boat? No. But if someone has the skills and temperament (patience, I guess) it looks like fun.
 
Looks like you already decided on an adhesive. I was going to recommend ShoeGoo
Very strong and has a little bit of flexibility to it.
 
Slow progress as life gets in the way.
Anyway electronics mostly in, just have to wait for smoke pump to finish with other voltage regulator. Lights installed and plumbed for water cannons.
Superstructure close to done, some slight issues with towers as the side pieces not long enough so had to cut down the middle support to allow fit.
Life boats done, lots of small strips and gluing but makes for strong finish.
Turned down a hardwood dowel for rudder control as was not happy with fit of included dowel.
Just over 12 lbs so far, will do float test in tub soon to get proper water line.

IMG_1479.jpg


IMG_1473.jpg


IMG_1474.jpg


IMG_1480.jpg


IMG_1477.jpg
 
Back
Top