3d Printed No prep build

Welcome to RCTalk

Come join other RC enthusiasts! You'll be able to discuss, share and private message with other members of our community.

This site may earn a commission from merchant affiliate
links, including eBay, Amazon, and others.

2wdMod

RCTalk Talkaholic
Messages
272
Reaction score
516
Location
Jackson, MI
RC Driving Style
  1. Bashing
  2. Racing
  3. Scale Builder
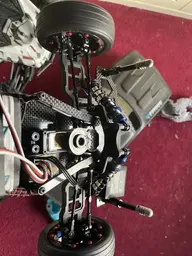
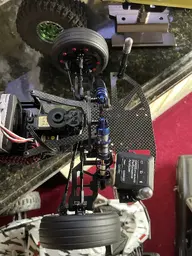
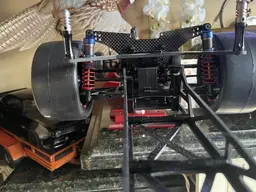
Alright guys, My name is Chad , and the purpose of this build is to build a no prep drag car that is as much 3d printed as possible while still maintaining enough performance to be competitive in the class. That being said , the front end will be slash build based as those parts are already available in STL form.. The main chassis and rear end will be of my own design .. In looking at the rules we must maintain a working 4 wheel suspension , check. We must have a transmission , Check.. Wheel base must be that of an SCT , Check.. Now that being said , the idea in my head is of a solid axle MOA design .. Think super simple gearbox integrated into a solid rear axle design similar to the rear end found on something like the Tamiya grasshopper.. But Instead of hinging for simple suspension , lets put it on a triangulated 4 link with the standard slash rear oil shock for ultra supple tunable suspension.. Is this going to be some ultra super performance design ? No.. quite simply It is intended to be a mechanically solid 3d printed chassis to go under the current offering of lexan bodies.. That way those of us that enjoy printing our R/C's can get in on the 1/10 drag game.. The first 2 purchased components I have for the build are a pair of pre-mounted R slicks , and the pro-line 85 Camaro body , I have the first printed components for the build on the machines right now.. A pair of wheels that are pretty close to the pre-mount wheel design , and I printed the front tires out of TPU. Here are the R tires and I will post pics of the printed fronts as soon as they are off the machines..
View attachment 144360
 
Smart move in purchasing a body before beginning a custom chassis build. Fitting a chassis to a body is preferred to fitting a body to a chassis whenever possible. I've done both.

Good luck with your build. Look forward to following your progress. Cheers. 'AC'
 
Will be fun to watch this build. I have a few parts printed for our Slash. I straightened up the front shock tower and got rid of the caster in the front suspension. I also played around with the body mount angles.
 
Looking forward to this build.

Here’s some pics of the drc maxim. Purpose built no prep. Everything’s flat on it. May give you some ideas. Keep us posted. Love to see what you come up with!

Let me know if you need measurements or close ups if a part.
 

Attachments

  • 95828691-DA06-4435-B1AF-0CFDFD6E9326.jpeg
    95828691-DA06-4435-B1AF-0CFDFD6E9326.jpeg
    344.8 KB · Views: 90
  • 7CC3626E-07F1-474F-BEE8-0F76598F271B.jpeg
    7CC3626E-07F1-474F-BEE8-0F76598F271B.jpeg
    315.4 KB · Views: 81
  • 1A31FB15-93D1-4872-B2C4-518F82B40FDC.jpeg
    1A31FB15-93D1-4872-B2C4-518F82B40FDC.jpeg
    375.5 KB · Views: 126
  • C5284AD4-84FC-4266-B7EC-9804E4746BD3.jpeg
    C5284AD4-84FC-4266-B7EC-9804E4746BD3.jpeg
    286 KB · Views: 120
  • 27A0D61E-F488-4CEF-B14A-CBC968D473BC.jpeg
    27A0D61E-F488-4CEF-B14A-CBC968D473BC.jpeg
    274.4 KB · Views: 106
  • C0BC976B-E85D-42E1-BC40-AB2163827879.jpeg
    C0BC976B-E85D-42E1-BC40-AB2163827879.jpeg
    354.7 KB · Views: 102
I figured the best way to go forward was to start printing out some parts and see what available free files are good, what ones need some help , etc. So I started by using a rustler/bandit chassis and stretching it by 49mm and splitting it into 2 halves that bolt together so It will fit on an Ender3 sized bed.. I found some 7mm Drop arms for the bandit , those should help lowering the CoG even further.. I beefed up the Rear axle carriers both at the hinge point and the camber link area.. I can't find a transmission housing already modeled, so I am going to buy the plastic cases to model one up from..
20220328_102102.jpg
 
wow been very busy the last couple weeks with some Bizness.. Also built a printed no prep car.. just need to load electronics and paint the body.. I printed every component I could on the chassis ..as it stand as a roller the only purchased items have been a body, a set of alloy shocks, a set of pre -mount rears , a super cheap metal gear transmission from amazon.. for $20 it has all metal gears , bearings, a slipper, is spooled /no diff, and bolts up to traxxas drive shafts with minimal modification..I had to design an adapter for the transmission to bolt in.. I used a set of 7mm drop bandit arms so I had to redesign the shock towers to move the camber link locations to match the 7mm drop. Total cost on the roller as you see it is around $125.. The body was the most expensive part at $48.. And of course the only actual traxxas parts on this traxxas based build are the drive shaft assemblies.. Thats right, the only traxxas parts are the universal driveshafts.. Waiting for the motor /esc to arrive , I intend on this being my 13.5 no bar ride..
20220418_175948.jpg
20220418_180147.jpg
20220418_180338.jpg
20220418_180512.jpg
20220418_180551.jpg
 
Well I still dont have paint on the shell because I am waiting on some new liquid mask to arrive, BUT I was able to get some first passes on the car.. My 13.5 /sensored system of choice is on backorder until june , so to get some chassis tuning done I went ahead and spent a whopping $55 on an elcheapo system from scamazon.. Paired a 120a sensorless with a 5900kv 4 pole motor.. I figured if it didnt smoke on the first pass I would be impressed.. Its holding up better than I expected.. First passes were clocking in at 51.3 mph in 132 ft.. and thats with the timing and punch set to factory defaults .. I should be able to squeak out mid to upper 50's with some tweaking.. first big help would be a battery that isnt 8 years old and has more than a 25c rating,LOL I bet I can get a couple more MPH just by running a decent battery,LOL I designed and printed out some 5 spoke wheels as I didnt like the wheel pattern .. the 5 spokes go with the 80's body way better..
20220426_094726.jpg
20220426_082923.jpg
20220426_083005.jpg
 
Amazing how much of this you can make yourself. :thumbs-up:
That my friend is the whole point.. Experimenting and seeing just how far you can take "self production" .. as long as I have a printer , I never have to worry about "parts availability" for almost 90% of this build.Any changes I want to implement I am in full control of.. For example this car runs 7mm drop arms with matching 7mm drop towers , has 1.5* anti-squat in the rear toe block . If I want to change the toe I print out some arms with different toe angles at the hub carrier.. etc.. Its complete tuning control .. I can sit here and mess with all sorts of different set ups for the cost of filament..
 
so I got some paint on the shell.. Not exactly what I had in mind ,but I couldnt sell my soul to lay my hands on some liquid mask right now, so a simple 2 color scheme it is!!
20220427_091201 (2).jpg
 
while I have been dialing the car in shes getting faster , that being said I got a bit sideways and wadded her up in testing at about 30 mph.. was totally expecting some broken stuff as it ended in barrel rolls.. But nope!! Not a broken part 1 !!
 
while I have been dialing the car in shes getting faster , that being said I got a bit sideways and wadded her up in testing at about 30 mph.. was totally expecting some broken stuff as it ended in barrel rolls.. But nope!! Not a broken part 1 !!

Now that is amazing! I never have that kind of luck.
 
That's what I'm talking about, super nice job...
 
well I FINALLY broke a printed part.. I broke the front bulkhead , BUT it was my fault by putting a bolt that was too long in the bumper holes and cracking it along a layer line.. So I have to call that one user error..
 
Back
Top