• Welcome to RCTalk! 🚀

    Join the #1 RC community where hobbyists connect, share, and get expert advice on RC cars, trucks, boats, drones, and more!

    • Friendly & passionate RC enthusiasts
    • RC tips & troubleshooting
    • Buy, sell & trade RC gear
    • Share builds & upgrades

Team Magic M1B Buggy build thread.

This site may earn a commission from merchant affiliate
links, including eBay, Amazon, and others.

Ryan with savage

RCNT Official "Knobhead"
Messages
617
Reaction score
0
Points
0
Location
Surrey
RC Driving Style
Well here we go folks.....

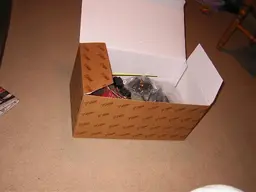
On the box is written "Join us now in owning a car that will one day be regarded as a legend" - Pretty bold stuff huh? A legend in a good way?

(you may have to forgive me on the qualify of some of the pics!)

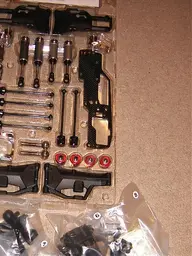
On opening the box you are presented and tray containing the major metal parts, pre-built shocks radio tray etc, a large brown branded box containing three main bundles of numbered bags (corresponding to each stage in the build) a box containing the three pre-built diffs silicone diff oil (more on these later), and the baggy containing the build manual, decals, threadlock, body masks and tools.

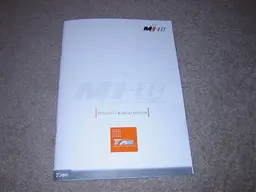
The Manual itself is very nicely prepared, good weighty paper - glossy finish an embossed M1B logo in the front. I'm already impressed - Read this through before starting the build.


Supplied is a very neat screw box with a helpful decal to be applied to rhe lid, the 1st job is to separate the various hex bolts/nylock nuts etc into the correct compartment as indicated - not seen a manufacturer do this before.
 

Attachments

  • boxinner.webp
    boxinner.webp
    56.7 KB · Views: 199
  • Contents1.webp
    Contents1.webp
    93.4 KB · Views: 207
  • manual.webp
    manual.webp
    75.5 KB · Views: 219
It's very reminiscent of a Tamiya kit, in a way. This ought to be a great build. I envy ya Ryan; I wish I had a project to work on now.
 
I'm building one too the best thing in the manual is the last pages it teach you how to make the setups for all the car !! and it give you a good information how to be a pro
 
I'm building one too the best thing in the manual is the last pages it teach you how to make the setups for all the car !! and it give you a good information how to be a pro

Actually I do like this part - Its a kind of an idiots guide to setting up a car..along the lines of more "More Camber will give you more of this but less of this" all arranged in a sensible order of effectiveness.

I'm nearly finished building mine - I'm at the putting the engine in stage and setting up the brake/throttle linkages stage.

There are some parts of this buggy that I think are awesome- a couple of other bits I'm not so impressed with (radio box is tiny and awkward, battery compartment only takes a flat pack arrangement, which is a pain when I've get 4 sets of 1600 mah hump packs). But over all i'm very happy and pretty impressed with it.

I will try to update this thread later - can anyone tell me how to embed an image in the thread rather than post it as a thumbnail??

Thanks Ryan.

PS Sorry for the delay folks.
 
Get the XXXMain touring car setup guide. While it is geared more for on-road setups it does an excellent job of giving you scenarios on what your car is doing and what you can do to fix it with different options. I race strictly off-road and use it all the time. Also the Xray XB8 manual has a pretty good section, you can download the manual. I also have a link somewhere for a buggy setup guide online but can't find it right now.
 
1st part of build.

Attach 4mm front shock tower to supports and to top of gearbox.

DIS-assemble prebuilt diff to put in oil (wtf? why bother prebuilding?)

<Notice fraction pads inside diff, these are adjustable by way of grub screw in case.>

gboxf2.webp

diff2.webp
 
Last edited:
Ryan with savage) you know this is my first buggy i install alone and realy I'm having fun .. i finsh almost ... but i still have the servos radio instlation and then eng .. !
 
Then we attach lower half of gearbox with diff, pinion etc, wishbones are attached. Gearboxes are completely sealed. I Like this feature. Should stop 99.9% are dirt from damaging diff ring gear etc.

frontend.webp


frontend2.webp


Front knuckles have kingpin arrangement. The kingpins are loctited in place. There is also two (tiny) threaded holes either side of steering arm, where you place a small silicone bush and tighten towards the kingpin with a grub screw. (See pic) Neat. I like this too.

knuckleclose.webp


Ryan with savage) you know this is my first buggy i install alone and realy I'm having fun .. i finsh almost ... but i still have the servos radio instlation and then eng .. !

Its a good build, very straight forward.

Thats the one bit I don't like about this buggy, the radio box is almost impossibly small but I'll get to that later in the thread.

Next up :- attach the central spines, side guards (not all of the mounting points are used yet) to chassis along with front gearbox.

Chassis is a lovely milled piece.

Also note orange "lumps" these are there to provide more support for pipe and to stop in from damaging side guard. (Both my Lightning Pro and MBX5 suffered from damage in this area due to heat)

chassisd.webp
 
Ryan with savage
you got the lighting pro me too got it and have the same problem your talking about i think this buggy is perfect
 
I'm already diggin the arm design. They look like they should be able to take a pretty good sized impact.
 
Set your camera to the macro setting and move back a little, then use the zoom to get in closer. You'll get clearer pix.
 
my photos :)

Photo-0011.webp

the front dif.
Photo-0030.webp

full gears installed
Photo-0035.webp

look to the break sys.
Photo-0039.webp

servos and resaver box
the front
Photo-0036.webp

i will post more photos after i finish from the fule tank

Photo-0040.webp
 
Wow... The throttle servo actually lays down? Now THAT is different! Also, the brake pad location, on the lower half of the center diff mount.

This buggy is really shaping up to be interesting... I'm curious to see how they perform.
 
man i saw it on the net i will give you the link go there and look to the yellow car man its awsem [ame="http://www.youtube.com/watch?v=h1cFG839M00"]YouTube - Crompton Team Magic M1B[/ame]
 
More pics

More interesting features :-

Radio plate is graphite and mounts onto 5 alloy posts...kept in place with 3 body clips (2 of these posts don't reach through top of plate.) In this photo you can also see the battery compartment which will ONLY take stick rx packs...annoying....
radioposts.webp


With radio tray attached. Here you can see the tiny (and I mean tiny rx compartment) very difficult to get everything in here. again....annoying....

almostcomplete.webp


Rear gearbox, here you can see the 2 chassis braces.

rearsowingchassisbrces.webp


Beautifly made brake discs, front is larger than rear, both are drilled and vented, they are also snug on diff outdrives. Pads are made of proper 1:1 type material. An alloy piston is pushed by a horizonal cam against the back of pad to squeeze them together. Pads are separated when brakes are let off by 4 small springs seen in photo.
brakeparts.webp


More or less complete, how slim is this profile? There is a ridge in sideguards where body sits.
slim.webp
 
Back
Top