Project Rival MT10

Welcome to RCTalk

Come join other RC enthusiasts! You'll be able to discuss, share and private message with other members of our community.

This site may earn a commission from merchant affiliate
links, including eBay, Amazon, and others.
On the decals, peel the backing about half way off, then cut it there. Then, remove sbout a 1/8" strip from the backing and reinstsll it on the decal. You will be left with a 1/8" strip of backing missing from the center of the decal. Now place the decal on the body and position it while trying not to press down on the exposed strip in the center. Once you have the decal lined up, use your finger to press down the exposed area really good. Then, you can lift the decal, curling it back over itself, and kinda roll the backing out as you press the decal down from center out. Works like a charm.
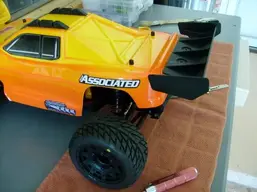
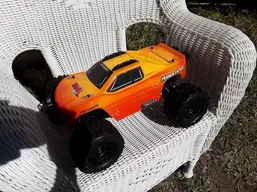
Great tip. Thanks, Kevin. Would have liked to have had that tip yesterday. Laid down the window stickers of the FSS MT10. Windshield sticker did not want to lay down without creases where it curves over onto the roof. Driver side sticker had a crease in it from the sticker sheet getting folded in packing or shipping.

Generally, use a mixture of warm water and Johnson's baby shampoo on the body surface to enable me to position the sticker on application. I'll try your dry application method next time. Always up for something new to aid in a build.

Anyway, yesterday was warm, ~70degF. Took the project outside and set the stickers in the afternoon sun to soften them up. Then able to work out the blisters and creases. Me and stickers be done for a while. Whew!

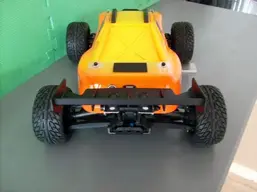
And guys, you and Sharon were right. FSS MT10 looks better with them applied. Cheers. 'AC'
 

Attachments

  • 20220214_131625_resize RCT.jpg
    20220214_131625_resize RCT.jpg
    89.9 KB · Views: 101
Last edited:
Look at this vid 4 minutes in. This is how I apply all my decals. Mark does a really good job applying decals. Check out some of his other vids for some good tips to make life easier.
 
I'm flying Mark across the pond to sticker my next body. :happy: Excellent video, possibly the definitive video on stickering I've seen. That and it is my all-time favorite rallye car and livery to boot. That makes the vid an easy watch.

Mark makes use of a wooden dowel rod. I have a 1/4in dowel rod pencil sharpened on one end and angle flattened on the other to smooth the edges of window mask to prevent bleed-through. Like that Mark peels off the protective film as he goes working front to back stickering up.

Got a JConcepts '85 Ford Ranger body on the wish list. It is listed as a "fit" for the MT10. I'll adopt the 'Mark Method' for that one. Cheers. 'AC'
 
I use q-tips to get into tight spots. I don't like hard tools for decalling. They tend to push the glue around and cause the decal not to stick.
 
On the decals, peel the backing about half way off, then cut it there. Then, remove about a 1/8" strip from the backing and reinstall it on the decal. You will be left with a 1/8" strip of backing missing from the center of the decal. Now place the decal on the body and position it while trying not to press down on the exposed strip in the center. Once you have the decal lined up, use your finger to press down the exposed area really good. Then, you can lift the decal, curling it back over itself, and kinda roll the backing out as you press the decal down from center out. Works like a charm.
Oh, so you can position it, without getting the decal all oily and smudged! Smart trick, you can also spritz a little bit of diluted soapy water on the body first, that'll allow you position the decal, squeeze some water out, and it'll stick on like normal once it dries.
 
That method is great for conventional paper backed stickers. It becomes a little more difficult applying die-cut stickers like come with the MT10. With those, one has to handle and position the entire sticker surface all at once. 'AC'
 
Going with the Futaba 4PLS on this project. Been waffling back and forth between it and the Spektrum DX4C. Have three 4CH receivers for the Fut, only one for the Spektrum. Need that third channel for the running lights on both MT's. That was the deciding factor. Actually, prefer the simpler settings and better balance of the Spektrum. Economics of parts (receivers) on hand won the day this time.

Cleared all the model names and settings on the 4PLS and bound two receivers. One for this project - calling it the FSS MT10 - and one for the other stone stock Rival MT10. Then did a full 3CH system check on both receivers, steering, throttle and running lights. A.O.K. and good-to-go. The receiver on this project is the external antenna nitro/electric application type. Thinking the extra range an external antenna provides may prove useful for on-road. Other two receivers are the "E" electric only application type with internal antenna.

Test fit the receiver in its box packed with foam. Decided not to secure the receiver inside the box with double sided tape. Too hard to get out for service or inspection. Ran the receiver foam packed back in the days of 1/8 nitro bug and encountered no issues.

Thanks for looking in, mates. Cheers. 'AC'
 

Attachments

  • 20220216_160510_resize RCT.jpg
    20220216_160510_resize RCT.jpg
    44 KB · Views: 48
Moving apace to get the project out of slider status. Mounted a set of Pro-Line Trencher 2.8in tires. Alas, much too big for my liking. FR wheel interference with the body at full lock; RR wheels almost zero clearance. One wheel/tire combo weights in at a whopping 8.5oz. That's a full 3.25oz heavier than the OEM Rival wheel/tire combo. Full set of four trenchers adds 13oz, almost a full pound, to the weight of the MT10. Asking a lot of a 4mm axle and 12mm hex. Set them aside for now.

Had to fall back, regroup and reorder. Have a set of P-L Street Fighter LP (Low Profile) 2.8in coming FedEx. Thinking those will be better suited to what I am doing with the Rival anyway. Sooner or later the FSS MT10 will achieve roller status. . .

Thanks for looking in. Cheers. 'AC'
 

Attachments

  • 20220213_164015_resize RCT.jpg
    20220213_164015_resize RCT.jpg
    36.5 KB · Views: 55
  • 20220213_164043_resize RCT.jpg
    20220213_164043_resize RCT.jpg
    36.5 KB · Views: 53
  • 20220213_163215_resize RCT.jpg
    20220213_163215_resize RCT.jpg
    30.6 KB · Views: 60
Houston, we have a roller. P-L Street Fighter LP pre-mounted to Raid wheels arrived. Test fit wide adapters front and narrow adapters rear. Not the final set-up. A beginning, though.

In goes the Futaba 4PLS receiver. Will "probably" be the one I use. Still not a 100% with it over the Spektrum. Bench test servo gets a test install for now. Narrow offset's up front and there "could" be tire/body rub at full suspension depression. For now putting the wide offset's up front. A work in progress. More to come.

Steering EPA is set at 70% L and R. Servo arm is exposed under chassis and sits up in a recess for protection. Any more than 70% arc and the arm strikes the chassis. Not as bad as it sounds, as I usually run my steering EPA at 80% anyway.

This is usually when the chassis gets a free rolling test. Not so with the MT10. She's not a free roller like a 2WD ST.

82degF, sunny and low humidity today. A real treat working in the shop. It's one of those days when I am tricked into thinking living with Texas weather might be o.k. Cheers, mates. 'AC'
 

Attachments

  • 20220221_152122_resize RCT.jpg
    20220221_152122_resize RCT.jpg
    34.9 KB · Views: 69
  • 20220221_152059_resize RCT.jpg
    20220221_152059_resize RCT.jpg
    33.5 KB · Views: 67
  • 20220221_151900_resize RCT.jpg
    20220221_151900_resize RCT.jpg
    57.2 KB · Views: 76
  • 20220221_151820_resize RCT.jpg
    20220221_151820_resize RCT.jpg
    40.1 KB · Views: 69
Thanks 500 Mike. You not too far north of me. ~25-30miles or so? BW8/290 here.

Did a similar perimeter fade way back when on my 2008 electric top fuel dragster. Always liked that paint job and this was the opportunity to replicate it. Bring it back to life in a manner of speaking. That car may get a resto once the MT10 project is complete. Thanks for looking in. Cheers. 'AC'

[ Edit: credit for the paint job goes to a March 2003 Radio Control Car Action article, "world's easiest paint job that doesn't suck." Still have the article and used it as a reference for the MT10 job. ]
 

Attachments

  • S6301142_resize RCT.JPG
    S6301142_resize RCT.JPG
    38.7 KB · Views: 39
Last edited:
Yes, we are pretty close. I used to work near you, BW8/Fallbrook... about 4 yrs ago.

I am about finished with the paint job on my Tekno NT48 2.0 I went with the same color orange as you but with a metallic blue. It was my first attempt at spraying a body so I made some mistakes but that was to be expected. I need to get some white to back it all up and them get the decals on it.

If I do another body down the road, I might try the fade as you did. It would save the masking which is where I made some of my mistakes. Again I love that orange/yellow combo. Looks great. Nice job on the TF dragster also! 😍
 
Love it when a plan comes together. Stick around this hobby long enough and sooner or later things go your way. Almost embarrassed. Power unit practically a drop in. Servo too.

Starting with a 14T pinion. Checked fit with an 18T and can probably fit a 19T before running out of adjusting slot. Standard R-T-R pinion is 12T.

Servo EPA set at 60 Lft and Rt. Servo arm recesses into the chassis. Strikes the chassis with any more than 60. Which is o.k. For speed runs she'll run less than 40 EPA anyway.

Power unit is Spektrum 3300Kv sensorless brushless with HobbyWing 120A sensorless ESC.

Radio system is Futaba 4PLS with external antenna rcvr. Servo is ProTek PTK-130T HV.

Almost ready for a Phase 1 shake-down run. Phase 1 is 2s LiPo. Phase 2 is 3s HV LiPo. Need to solder a XT-90 connector on the 3s yet.

Progressing apace and nicely. As racing legend Bruce McLaren once said, "If it looks right, it probably is right." Got a good feeling about this project. Think she'll be a runner. Cheers. 'AC'

Before and after thumbnails below:
 

Attachments

  • 20220309_134826_resize RCT.jpg
    20220309_134826_resize RCT.jpg
    57.6 KB · Views: 47
  • 20220309_151142_resize RCT.jpg
    20220309_151142_resize RCT.jpg
    57.2 KB · Views: 44
Test run of the FSS MT10 today. No body. Minimum throttle. Checking out steering circle and set steering trim. So far, so good. First runs on 2s. 3s comes later. 'AC'
 

Attachments

  • 20220313_150122_resize RCT.jpg
    20220313_150122_resize RCT.jpg
    72.4 KB · Views: 35
  • 20220313_150130_resize RCT.jpg
    20220313_150130_resize RCT.jpg
    77.6 KB · Views: 32
Spent time working on the FSS MT10 project today. Noticed last time I ran she wants to squat in the rear under acceleration. Can use a bit of nose down attitude. Installed a pair of 9mm internal spacers on the shock shafts. Refilled the FR shocks with AE spec 40wt. RR shocks got emptied and refilled with 50wt. See how that works out.

Decided to skip right over the 3S build to 4S. Chassis seems stout enough.

Got a start on a wing install. Aarma wing. Scraps out of the basher stash just to flesh out the fit before building a set wing brackets specific. Plan is to use the existing wheelie bar mount as a bracket for the wing. Lots to do before she's 4S ready. Thanks for looking in. Cheers. 'AC'
 

Attachments

  • S6304255_resize RCT.JPG
    S6304255_resize RCT.JPG
    41.1 KB · Views: 56
  • S6304260_resize RCT.JPG
    S6304260_resize RCT.JPG
    53.4 KB · Views: 55
  • S6304256_resize RCT.JPG
    S6304256_resize RCT.JPG
    45.4 KB · Views: 55
Thanks, Kevin. Finished the beta install of the rear wing today. Using existing AE adjustable wheelie bar bracket and hardware with two nylon spacers and a set of aluminum bracket spares from a previous build. Was going to fabricate a new set of brackets, but these seem up to the task. Have a good deal of adjustability in this set up.

Aarma wing is part no. ARA480006. Cheers. 'AC'
 

Attachments

  • S6304262_resize RCT.JPG
    S6304262_resize RCT.JPG
    36.3 KB · Views: 43
  • S6304263_resize RCT.JPG
    S6304263_resize RCT.JPG
    43.1 KB · Views: 43
  • S6304266_resize RCT.JPG
    S6304266_resize RCT.JPG
    33.8 KB · Views: 44
Wow. Really impressive work there man. Looks like this is one for people to copy if they want a wing on theirs.
 
Soldered a XT-90 connector to the 3S x 4500 LiHV today. Put in an extra step attaching the XT-90. As a precaution, put heat shrink on each of the exposed connectors before securing the cap in place. Just in case.

Shorty 3S. Only one battery strap secures the pack. Added a strip of Velcro to the underside of the pack to secure the nose. Pack is mounted forward on the chassis. Can flip it for rear weight bias and the Velcro patch secures it in the position there too.

Reset the ESC for 3S and test ran the chassis out front of the house. A.O.K. Ready for a speed run serie. Geared conservative at 16/54. Probably gear up for follow-on runs. We shall see. Cheers. 'AC'
 

Attachments

  • S6304295_resize RCT.JPG
    S6304295_resize RCT.JPG
    37.4 KB · Views: 38
  • S6304296_resize RCT.JPG
    S6304296_resize RCT.JPG
    47.6 KB · Views: 39
  • S6304306_resize RCT.JPG
    S6304306_resize RCT.JPG
    71.7 KB · Views: 39
Back
Top