• Welcome to RCTalk! 🚀

    Join the #1 RC community where hobbyists connect, share, and get expert advice on RC cars, trucks, boats, drones, and more!

    • Friendly & passionate RC enthusiasts
    • RC tips & troubleshooting
    • Buy, sell & trade RC gear
    • Share builds & upgrades

T.Q.Grave Digger

This site may earn a commission from merchant affiliate
links, including eBay, Amazon, and others.

Robie6

RCTalk Racer
Messages
124
Reaction score
0
Points
0
RC Driving Style
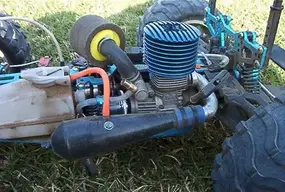
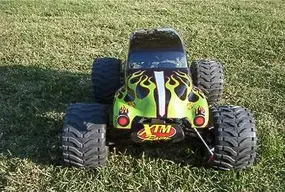
Hi all, was just out bashing my Q.T. & was wondering why so many put the T.Q. down, I run the piss outa this guy, just broke in the XTM-24.7 & it makes the .21 look like a .12 on bad fuel!! it'll roostertail all 4 tires, I've run it into a pole when it hit 2nd gear doing about 40, flipped it 1/2 dozen times, ran into all kinds of things round here learning on it, so far it's holding up like it just came from the box. I've had the whole truck 100% apart twice checking things out, so far only a bent shock tower, bent it back & kept going!! may have future problems with the 1-way berring shaft gauling & was told about it outa the gate & yes it is gauling a tad & plan to get the aftermarket super hard shaft & role cage, but all in all this bad-boy is great even with the extra power of the 24.7! it'll roostertail all 4 tires from dead stop, top out at least 45 (gotta learn to handle it that fast), the F&R diff. looks great as do the bell gears & trany spur & 2nd gear. Only running 16% Trinity fuel now, will go to 20% soon, & now that its tuned starts on first pull after priming the carb, this 24.7 is a great mill, tunes easy stays running belly up, & hasen't stalled once, but cold blooded big time, doesn't come on till about 220-F & runs 240-250 here in the desert, just finished the Parma 1/8 body its not mounted yet need some ideas using velcro & aluminum, heres a few shots, t/y Robie6

more shots
 
Last edited:
one question before i sayysomething stupid... what is a T.Q.? what do those leters stand for lol
Doug
:n00bie:
 
T.Q.

Thunder Quake by Dura
Trac
 

Attachments

  • im000738.webp
    im000738.webp
    45.7 KB · Views: 134
pics

trying to get more shots of the Grave Digger body, having trouble
 

Attachments

  • im000741.webp
    im000741.webp
    33.9 KB · Views: 130
this 1 at a time stuff sucks:banana:
 

Attachments

  • im000737.webp
    im000737.webp
    53.1 KB · Views: 128
If you upload them to the image gallery on this site you can then insert the images into one post by clicking on the IMG button and pasting the link of you gallery pic.

If you need help let me know.


Truck looks good!
 
thank you Christain, i knew it had to be something simple, i can build a monster computer, figure things out to 1/2-1000", keep my check book balanced, but can't upload a 5 cent picture-LOL:doh: i'll be trying your advice soon & will post some shots like the rest of ya guy's Robie6:breakdown
 
where did u get the body at...did u have to paint it?if so... nice job...that truck doesn't look like a bad one
Doug
 
Body

I got the body from Tower Hobbies, its a new 1/8 scale job from "Parma" www.parmapse.com, its new & fits great (once I get it on) the real Grave Digger is sort of a flip-flop blue/black, it looks black in the sun but under neon it glows blue, I used Testors transparent purple (2 coats) then Testors outlaw black (2-coats) on top of the purple, I'm by no means a painter, I like the fumes more so I painted it in the bathroom w/the door closed:thumbup: it came out more or less black inside & kinda a plum color outside, not really what I wanted but its ok if I did it over I would use transparent BLUE & just 1 coat of black & go from there, just a thought, try painting some clear plastic junk stuff untill you like what you get. As far as the decals the side pannels are vinyl & pretty easy to do, use windex as a floater till you get it right, I also (because of the size) cut the backing off in 3 peices as I went along, this way you dont have a bunch of sticky decal to deal with, just 1/3 at a time, as far as the flames go if I had it to do over again I'd mask & paint them on, the set I got was no way close to forming all the compound curves on the hood, as they are there are 4-sets for each 1/2 of the hood!!!! I spent a total of 8 hours getting them at least lookable, yes I also used a hair dryer to soften them up a tad but use heat with caution if the decals get to warm they "SHRINK" not good, notice the little round decals on the fenders where the flames bend? major fitting problem, thats where the seams of #1 & #2 set meets, no way, believe me I did alot of fitting after I cut out the 8 sets, & thinking, still a bummer, these sets are cut flat & when you try to deal with compound curves strange things happen & your not really sure where the last 1 will end, even Parma says you may have to slit these to make-um fit, forget it unless you apply decals for a living, just mask & make & paint your own, Robie6:hi:
 
Back
Top