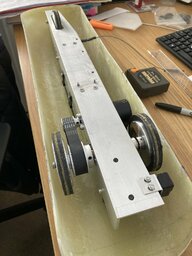
Scratch build electric tethered car racer

Welcome to RCTalk

Come join other RC enthusiasts! You'll be able to discuss, share and private message with other members of our community.

This site may earn a commission from merchant affiliate
links, including eBay, Amazon, and others.
I can't tell you how many times I was 2 or 3 coats into a paintjob before I realized I forgot to mark the pin holes. But that trick is something I came up with for mounting hardbodies, and it works surprizingly well.

You mentioned the body being heavy. After some testing, I bet you could lighten that chassis quite a bit with some strategically placed machined pockets here and there 😉

You're lucky I don't live close to you. I'd be dropping by unannounced all the time to give you a hand with this beast. It's just a killer project.

Ha ha, I am feeling a bit isolated as I have mentioned previously the other club members recon electric cars are the work of the devil, that is, it’s too easy, I did ping an early drawing their way but all they had to say was it will probably work! I get it IC power is loud, makes a great smell and is fun.

I did think about making big holes in the angle chassis, it might look quite cool too, if the car is a success I can always strip it down and make some big holes using a fly cutter
 
Last edited:
Decided to put some tap washers between the body shell and the chassis, I spent some time setting the clearance between the body shell and the drive shaft ends then set the front to be the same offset.

Need to drill the holes next and dremel out clearance’s for tether and safety wire.

IMG_5475.jpeg


IMG_5473.jpeg
IMG_5474.jpeg
 

Attachments

  • IMG_5478.jpeg
    IMG_5478.jpeg
    257.4 KB · Views: 9
Yep. Definitely a Sunbeam Racing Red. Looking good, mate.

View attachment 183675
That’s the one!

I will probably paint the nostril on and it deserves some text and a pilot, those flags look distinctive too.

Given that I decided to hide the wheels it will be more a homage to the look of the car rather than an attempt at semi scale
 
That's it, its made. Aside from possible future detailing, (repairs more like), I have stopped tinkering with it.

Next track day is 14th March, unless I am sent 'on site' or worse I will be there.

Track owner has been notified, it better not let me down!

IMG_5484.JPG
IMG_5485.JPG


Lower body lip has a fairly generous, (I hope) 20mm or 25/32" clearance to the ground, if the track is flat enough I can drop the body by removing a rubber tap washer spacer at each end, from between the chassis and the body shell!

IMG_5487.JPG


This is so much cleaner than my IC car!
 
Last edited:
Awesome finish. Looks fast!

All down to the camera angle I’m afraid, I should have filled the hollows and re sanded but I got impatient and painted it!
I know that I am a bad modeller.
All red vehicles go faster. :0)
 
Last edited:
All down to the camera angle I’m afraid, I should have filled the hollows and re sanded but I got impatient and painted it!
I know that I am a bad modeller.
All red vehicles go faster. :0)
You can use paint putty if it bothers you. Sand, fill, respray.
3M Bondo Glazing and Spot Putty, 4.5 oz, Fills Pinholes, Scratches, Minor Dings & Hairline Cracks, Can Be Used on Metal, Fiberglass, Wood and more, Fast Drying, Sandable in 30 Minutes (907C) https://a.co/d/1jMFFk8
 
You can use paint putty if it bothers you. Sand, fill, respray.
3M Bondo Glazing and Spot Putty, 4.5 oz, Fills Pinholes, Scratches, Minor Dings & Hairline Cracks, Can Be Used on Metal, Fiberglass, Wood and more, Fast Drying, Sandable in 30 Minutes (907C) https://a.co/d/1jMFFk8

Ahhh the good old days when I would work on my mates car bodies, I agree it works surprisingly well even on very shallow dents.
 
I took the car to the track today (sorry no video) and I have good news and bad news.

First the good news, I now hold the local track record, Hoorah!

The bad news is that my new track record is only 64mph LOL! Out of balance tires limited the 2 runs that I did.

Firstly I ran it with the car body on, the weight made the car top heavy and caused it to lean out against the tether.
The steel tether connection strap bent allowing the car to lean out further scraping the body work, (no big deal, just needs new thicker tether strap)
The aluminum tether attachment /adjustment plate started to pull through! (needs steel one!)
The front suspension limit bolt snapped! which is bizarre because it normally carries no load. Make it thicker
The screws holding the ESC down stripped (I have no idea how this happened) I cable tied it down for the 2nd and faster run!
The strangest thing is the tyres went oval. (I reseated them for the 2nd run)

Second run was with the body off.
Temporary thicker tether plate made up in the track owners workshop on the spot, (what a nice chap)
Got the track record with throttle movement to spare, (it can go faster)
Tyres went oval again which led to me stopping the run. ( I did squeeze the throttle at little more but the imbalance wouldn't allow it to go any faster.

Lessons learned:

The forces acting on the parts of the car way exceed my expectations, (yes I suppose I could have worked that out)
The tooth belt survived, the one thing I thought would fail first
The tyres need to be bonded in, the last item I expected a problem
I will grind the tires to improve balance
The tether connection needs to be up rated, made thicker
I guess you 'live an learn'

Everyone remarked how quiet it was :0)
 
You need to build a tire balancer huh. I was wondering how well that strap would hold up. Figured that was a standard item though.
 
You need to build a tire balancer huh. I was wondering how well that strap would hold up. Figured that was a standard item though.

@WickedFog , the strap is fairly standard amongst the other cars, but most of the others weigh quite a bit less. I am confident that it wouldn't have broken, but I did massively under estimate the bending forces on it, the replacement will be like a stirrup on its side.
Balance was good before the run, the car ran very smoothly , however as the speed rose the tires eased themselves out of the clincher rims and did so unevenly causing them to go oval or egg shaped which caused a lot of vibration.

It only then that the guy who designed the wheels said I glue mine in! I need to find out which glue he uses.

Other wise I am interested to know what other types of wheel and tires others use at high speed, some one mentioned solid metal wheels, I am a little worried about the damage they might do to the track.

Once repaired for the 2nd run and tires re 'clinched' the car definitely had more power to exploit and then the tires spoilt the party again. After the two runs I noticed the battery cell voltage was just under 4V so plenty of life available there.

Know that you know what needs improvement, you can move forward to better speeds. :thumbs-up:

Quite so @Doom! Shakedowns can be disappointing but its hard to imagine that I would have guessed everything right from the out.
 
Put your wheels back in the lathe, rubber clamping side out, and turn some concentric grooves in them, leaving like 2mm ribs sticking up. I'd start with only about 1mm deep on the grooves and see how that works out.
saga2-800x1097.jpg
 
Last edited:
Just one more thing, the others left the fenced area before the 2nd run!

Put your wheels back in the lathe, rubber clamping side out, and turn some concentric grooves in them, leaving like 2mm ribs sticking up. I'd start with only about 1mm deep on the grooves snd see how that works out.View attachment 184895

Interesting idea @WickedFog , I will have a think about how I might achieve this
 
Just one more thing, the others left the fenced area before the 2nd run!


Interesting idea @WickedFog , I will have a think about how I might achieve this
Do you grind your own lathe tools? We had a few face groovers we made from HSS blanks.
 
Back
Top