
Leanback
RCTalk Rookie
Hey Guys, I looked through some older tmaxx treads but didnt see any Drive shaft replacment threads.
Heres my story, I was running my tmaxx out in the street and in my front yard when i noticed a big performance change so i hit the gas a few times on the grass to see what the issue was when i noticed only the front wheels were pulling. I shut it down and flipped it over and noticed that i threw a pin in the yolk on the rear center drive shaft transmission side.
Being the total rookie on this i just wnt down to the hardware store and purchased some piano wire that was a hair to big for the receiving hole for the pin. With a drill and some sand paper i was able to get the piano wire the perfect size for the hole in the yolk. I was able to get my new homemade yolk pin in snug with the assistance with a small ball pein hammer.
The next day i took it out for a spin to see if it was going to work. So i fired it up and did some runs up and down the road with minnimal throttle and was running fine so i made another pass and was really getting on it when the pin came out again only this time it came out and lodged into a smooth round bell on the back side of the rear gear that meats up with the transmission gear and it fliped over in the road.
with all the above drama this brings me to you guys lol, so this is where i stand. I ordered a new set of center drive shafts from RC Super Store heres the link to the exact ones i orederd.
http://www.rcsuperstore.com/Traxxas_Steel_Center_Drive_Shaft_Set_T_Maxx_3_3_p/tra4949r.htm
I took the old rear center ds off yesterday afternoon in which i had to drop the transmission by taking the 8 or so screws from the bottom rail. I then was able to get the set screws off then removed the drive shaft and yolks. Upon further inspection i found that there were set screws that held in the yolk pin WALLA thats why i threw it lol. I had no idea that these trucks were that intricate down to having set screws to hold the yolk pin.
If you are still reading at this point i appoligize for the lenghty post.
My question is once i replace the drive shafts is there anything i need to do special in order to remount the transmission. I do not want to create more problems trying to fix my original problem. I am looking forward to actually running this thing for a few hours in one day with out major malfunctions.
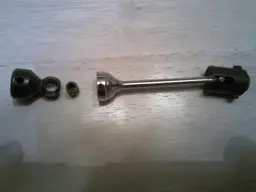
Here is a pic of the original drive shaft
Heres my story, I was running my tmaxx out in the street and in my front yard when i noticed a big performance change so i hit the gas a few times on the grass to see what the issue was when i noticed only the front wheels were pulling. I shut it down and flipped it over and noticed that i threw a pin in the yolk on the rear center drive shaft transmission side.
Being the total rookie on this i just wnt down to the hardware store and purchased some piano wire that was a hair to big for the receiving hole for the pin. With a drill and some sand paper i was able to get the piano wire the perfect size for the hole in the yolk. I was able to get my new homemade yolk pin in snug with the assistance with a small ball pein hammer.
The next day i took it out for a spin to see if it was going to work. So i fired it up and did some runs up and down the road with minnimal throttle and was running fine so i made another pass and was really getting on it when the pin came out again only this time it came out and lodged into a smooth round bell on the back side of the rear gear that meats up with the transmission gear and it fliped over in the road.
with all the above drama this brings me to you guys lol, so this is where i stand. I ordered a new set of center drive shafts from RC Super Store heres the link to the exact ones i orederd.
http://www.rcsuperstore.com/Traxxas_Steel_Center_Drive_Shaft_Set_T_Maxx_3_3_p/tra4949r.htm
I took the old rear center ds off yesterday afternoon in which i had to drop the transmission by taking the 8 or so screws from the bottom rail. I then was able to get the set screws off then removed the drive shaft and yolks. Upon further inspection i found that there were set screws that held in the yolk pin WALLA thats why i threw it lol. I had no idea that these trucks were that intricate down to having set screws to hold the yolk pin.
If you are still reading at this point i appoligize for the lenghty post.
My question is once i replace the drive shafts is there anything i need to do special in order to remount the transmission. I do not want to create more problems trying to fix my original problem. I am looking forward to actually running this thing for a few hours in one day with out major malfunctions.
Here is a pic of the original drive shaft
")