SORRCA class 1 build.

Welcome to RCTalk

Come join other RC enthusiasts! You'll be able to discuss, share and private message with other members of our community.

This site may earn a commission from merchant affiliate
links, including eBay, Amazon, and others.

Iowa crawler

Hardcore RCTalk User
Build Thread Contributor
Messages
1,485
Reaction score
2,601
Location
Iowa
RC Driving Style
  1. Racing
  2. Crawling
  3. Scale Builder
  4. Flying
I am going to build a class 1 SORRCA hard body. I have been looking for a body and have a couple things to think about.

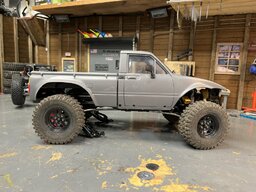
I really liked building my TF2 as a class 2 when it still had a front grill and bumpers it was nice looking. But to get max performance some cuts need to be made for tire clearance.

Class 1 is a street truck you would drive to work daily and maybe go off road a little.

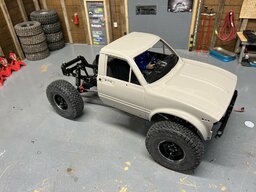
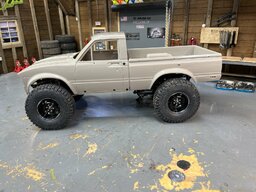
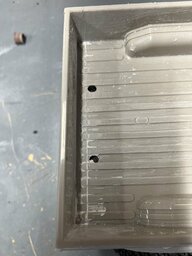
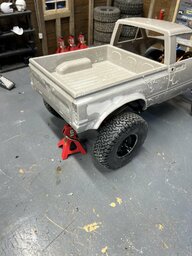
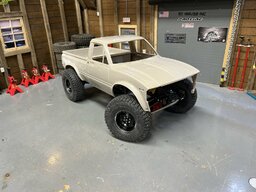
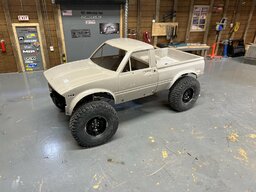
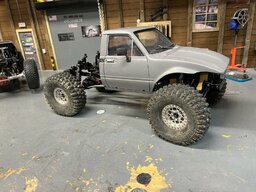
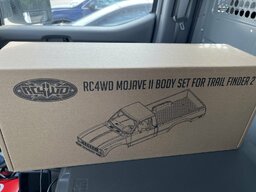
I want a vintage Jeep or pick up truck. I don’t want an SUV style truck or a 4 door. Just a personal preference. With all that BS in mind I decided to just get another TF2 and make it a class 1. The Injora hardbody’s look OK but I just think they look heavy and cheap.

Class one has different rules. Like a 4.19 maximum tire size.
Need full size front and rear bumpers
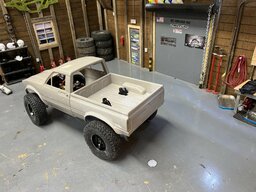
A hard body with full interior.
Lights and scale accessories.
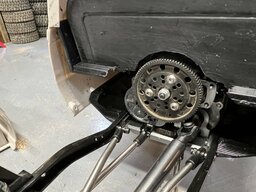
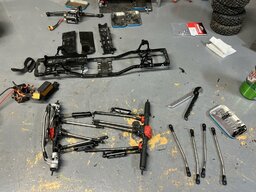
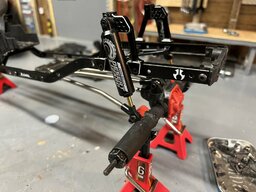
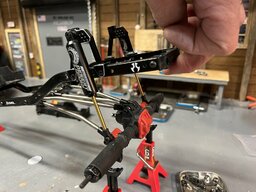
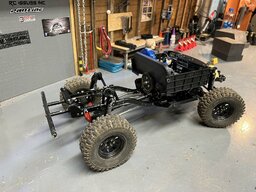
And a METAL frame with shock hoops that are bolted or welded on to the frame.

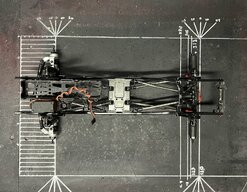
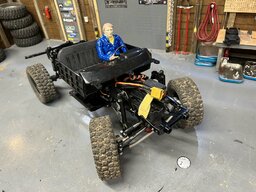
So I’m going with a basic SCX10ii frame.

I’ll stiffen it up with appropriate metal chassis stiffening and build it with the aftermarket parts I have around.

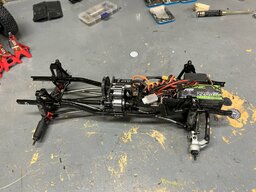
For a power system I’m going to go with a Firma 40 brushed system. The system is fine for most applications and it fits in the battery box with the battery drastically reducing the size and weight of the electronics.

Now for the fun part
I’m going to buy or build a trailer and use the class 1 truck to tow the class 2 truck to the trail head and both trucks will be Toyota Hilux.
The only stipulation is no black paint. I don’t like the Marty Mc Fly thing.

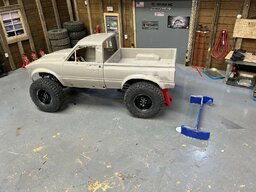
I have most of the parts, but need printed body mounts and some other stuff. But let’s see how it all goes together.
 
This is the pile of stuff I have. It’s all good stuff. Just a little old technology and some of it is just used.
 

Attachments

  • FF35DD59-E46F-4156-86F7-9EC7E1EC51BF.jpeg
    FF35DD59-E46F-4156-86F7-9EC7E1EC51BF.jpeg
    400.3 KB · Views: 101
Working on the rear suspension first. I am using a kit AR44 rear axle and 8/27 under drive gearing. The links are Traxxas revo links on SAMIX titanium high clearance links.

This is the lightest rear axle set up I can make.
The shocks are set to have just a little travel left when the suspension bottoms out.

Hot Racing shock towers and rear cross bracing.

Rear bumper will be the trailer hitch bit.

Now on to the front. This part takes longer and I don’t have as much good stuff. But I can make something work.
 

Attachments

  • 09676B3D-B8D6-4CE9-9EB2-4BD01214033E.jpeg
    09676B3D-B8D6-4CE9-9EB2-4BD01214033E.jpeg
    374.5 KB · Views: 99
  • 1C2B5F53-0979-4E65-BE8C-5C619E91DB3F.jpeg
    1C2B5F53-0979-4E65-BE8C-5C619E91DB3F.jpeg
    254.4 KB · Views: 91
  • 689DF0B6-B392-46C8-93AD-CC13C810582F.jpeg
    689DF0B6-B392-46C8-93AD-CC13C810582F.jpeg
    261.5 KB · Views: 117
Got the front together . It probably still needs some tuning but for now it rolls on it’s own power. And it pretty compact.

The wheelbase is 313 mm or 12.3 inches.

I put an old cliffhanger body on it for now and I want to take it out this weekend.
 

Attachments

  • DA104F9E-659F-4333-9654-E644765A8727.jpeg
    DA104F9E-659F-4333-9654-E644765A8727.jpeg
    563.3 KB · Views: 109
  • 2E1067E1-A5FC-4E9C-BBFE-204B4393BC75.jpeg
    2E1067E1-A5FC-4E9C-BBFE-204B4393BC75.jpeg
    369.1 KB · Views: 114
  • 08944454-64C9-4494-BD13-BB372A786315.jpeg
    08944454-64C9-4494-BD13-BB372A786315.jpeg
    343.6 KB · Views: 123
I finally got the printed body mounts to adapt an RC4WD Mojave 2 body to an SCX10ii chassis.
Thirty bucks and they come with a rear mount for the bed.
Now that I can see the body fits I will order another body kit in a couple weeks.
 

Attachments

  • 99A25705-B91B-4C03-B380-C209881F4FBA.jpeg
    99A25705-B91B-4C03-B380-C209881F4FBA.jpeg
    373 KB · Views: 85
I removed the rear shock tower to get an idea about the bed will fit.

This is the class 2 body on the class 1 frame. Obviously I need to move the rear wheels forward about 10mm to have a 300mm wheelbase. Currently it’s about 310.the body is also a little higher up. But that helps tire clearance.

So on the class 1 body I can bob the bed and trim up to the bottom of the headlights. But the front can’t have the pinch fenders, boat sides, dove tail.

I need bumpers and a trailer hitch not sure about lights. But probably run lights.
 

Attachments

  • image.jpg
    image.jpg
    348.6 KB · Views: 84
I am still waiting on the truck body. But I got the interior and the rear bumper kinda done. Still need a trailer hitch.
 

Attachments

  • 885B7719-DA85-45C6-B4C6-D4B6E04716DD.jpeg
    885B7719-DA85-45C6-B4C6-D4B6E04716DD.jpeg
    391.1 KB · Views: 94
  • 16A6A04B-FE29-461B-88F2-9FF5E4A6D5CA.jpeg
    16A6A04B-FE29-461B-88F2-9FF5E4A6D5CA.jpeg
    387.1 KB · Views: 97
Been watching the delivery instructions and finally got the “OUT FOR DELIVERY “ .

Woo hoo I love that.

Now I can get started on my class 1 body.
The description for a class one truck is something you would drive to work on a daily basis and sometimes take out on a trail.

So this is going to be the tow rig for my class 2. If I want to take two trucks crawling this is the best way. Just drive to the rocks unload drive back and load up.

I’m kinda going for a beater/ work truck with a rusty trailer. I like having the modified truck being hauled by a beater of the same model. Like someone that’s into those trucks and has a bunch of them.
 

Attachments

  • image.jpg
    image.jpg
    325.9 KB · Views: 68
Ok let’s start having some fun.
The body fits but the trans gear is cutting into the back of the seat. This is perfect . That part is hidden and does not mess with the bed.

Once I get the cab fitted I can get to work on the bed.
 

Attachments

  • F83E58C2-07AD-416D-85E8-F41337309061.jpeg
    F83E58C2-07AD-416D-85E8-F41337309061.jpeg
    317.8 KB · Views: 331
  • image.jpg
    image.jpg
    203.5 KB · Views: 71
Been fooling around with links and this is as close as I can get it. So I will just modify the rear part of the bed to make the wheel in the center of the wheel well.

And I made a nice cavity to hide the super gear.
 

Attachments

  • 839F77EC-3DB1-4209-B504-96B07155F72A.jpeg
    839F77EC-3DB1-4209-B504-96B07155F72A.jpeg
    345.6 KB · Views: 80
  • ACDB401B-4E66-44F4-8EA7-DE036B890A29.jpeg
    ACDB401B-4E66-44F4-8EA7-DE036B890A29.jpeg
    335.6 KB · Views: 80
I bobed the bed. I think that is about all I can do for now. I have to make the rear bumper finish the wheel wells and smoot out the seam. Plus reinforcement for the rear section.
Nothing to really do on the front except the front bumper. So I’m stuck .
 

Attachments

  • BFED962F-B1FF-40AD-BD2A-7EF5DBA72AB2.jpeg
    BFED962F-B1FF-40AD-BD2A-7EF5DBA72AB2.jpeg
    379.9 KB · Views: 483
  • E6DB0BDA-D442-4F72-A946-1A8F9A6DA12B.jpeg
    E6DB0BDA-D442-4F72-A946-1A8F9A6DA12B.jpeg
    281 KB · Views: 86
I like the Toyota pickup. I had a 1988 black with big tires and Smitty Built bumpers. I really liked it.
When I got my first crawler I wanted to replicate it. So I used the proline body. First time out on the trail a person walking past said it was a Marty Mc Fly truck and I was not happy. I honestly didn’t notice because I only watched the movie once.

Going to a hard body I wanted something I like and something cheap to fix. The cab for instance is 16 dollars to replace if I fall off a cliff.
 
Getting the body work smoothed out and reinforcement to the underside is next. I got a little to hot on the right side. My advice is go slow. And get the plastic hot enough to bend but not to hot to touch. And have some cool rags around to control the heat. It is easy to over heat something.
 

Attachments

  • FB92B570-6BFD-48EA-92DF-91428282BE24.jpeg
    FB92B570-6BFD-48EA-92DF-91428282BE24.jpeg
    226.7 KB · Views: 99
  • E02BB1D3-1BE7-434F-8EDB-EB7FF3CD31EC.jpeg
    E02BB1D3-1BE7-434F-8EDB-EB7FF3CD31EC.jpeg
    341.4 KB · Views: 75
  • 2728B9A0-3209-472C-B5EF-059D74126EFA.jpeg
    2728B9A0-3209-472C-B5EF-059D74126EFA.jpeg
    335.1 KB · Views: 71
Now the body is mounted and reinforced with epoxy and fiberglass cloth. Now it’s sanding and priming and sanding in that order.
Gotta figure out a trailer hitch. And I need the trailer for that.
Going to try the vs410 bumper set. They are like 16.00. And I have a set I can try.
 

Attachments

  • image.jpg
    image.jpg
    325.7 KB · Views: 115
  • 6F6FE827-832F-437B-AABC-AD36C089A05B.jpeg
    6F6FE827-832F-437B-AABC-AD36C089A05B.jpeg
    307.1 KB · Views: 79
  • EA7CE739-0301-4FAA-97DA-B4485F5E8C5F.jpeg
    EA7CE739-0301-4FAA-97DA-B4485F5E8C5F.jpeg
    350.5 KB · Views: 81
  • 98DC072A-FC34-4451-AC15-24899C786B3E.jpeg
    98DC072A-FC34-4451-AC15-24899C786B3E.jpeg
    319.1 KB · Views: 85
Back
Top