3D printed Soviet ZIS-151/CA10 Truck

Welcome to RCTalk

Come join other RC enthusiasts! You'll be able to discuss, share and private message with other members of our community.

This site may earn a commission from merchant affiliate
links, including eBay, Amazon, and others.
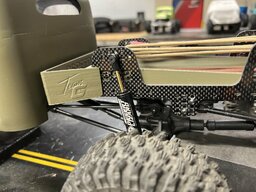
LW-PLA prints as a foam. It both lacks most of the grain from normal printing, and is sandable immediately after printing. Might be worth checking out.
 
It sanded pretty well I think. I got it pretty smooth with 80 grit paper. I worked by hand to keep the heat down. And just went around till I ran out of paper.

Now I want to mount the body somehow. Then tomorrow I’ll get some primer. The print feels flexible to me and I’m thinking fiberglass is way to ridge. What type of glue would I use to strengthen panels. Some areas are not attached at all.

Behind the hood is a 2 mm gap.
 

Attachments

  • 2458A727-0F7E-43CB-9465-6EC4DA7A04C7.jpeg
    2458A727-0F7E-43CB-9465-6EC4DA7A04C7.jpeg
    426.9 KB · Views: 50
  • 994FA484-8EEA-4D3D-9AEE-32C3C7E941D8.jpeg
    994FA484-8EEA-4D3D-9AEE-32C3C7E941D8.jpeg
    549 KB · Views: 42
  • 4D25E7CB-ED78-4563-935F-934CFCE8F862.jpeg
    4D25E7CB-ED78-4563-935F-934CFCE8F862.jpeg
    420.1 KB · Views: 47
If the gaps are huge you might be able to just superglue them then sand the super glue flush when done. Or "tack" it with superglue then use body filler and sand it. @NCNitro might have some input.
 
For the big gap I used a shoe glue type materiel. It will be flexible but super strong in about a week it get hard. I went over all the seams and joints with plastic weld and filled the little pockets or defects with white filler.
That all sanded off nice and I put on a heavy coat of primer. When that dries I’ll sand it down with 180. Then prime again. Once I hit 400 grit paper I’ll start to use water.

Can’t decide on color. Flat black is top choice for now.
 
I would go OD with slightly different shade to appear that markings were removed from military vehicle.
Yeah, that would look cool. I would camo the shiznit out of that truck personally.
 
This is going to be a strange project. It is out of my wheelhouse and a challenge. So I accept it as such. Failure is going to be listed as plan A. Then just move on to plan B.

Everyone is getting tired of the power wagon bodies. I like them but don’t want three. Plus I really like hard body trucks after building the two comp trucks.

I have no idea what I’m going to build either. But I bought the body for 65 bucks and that’s about the cost of a power wagon.

My big choices are 4x4 or 6x6
Tube back, pick up or a flat bed stake body.

With the pinched nose I’m not sure about servo on axle or CMS.

I do have a light kit I made up with cool headlights.

View attachment 141327View attachment 141328View attachment 141329
Ohhh damn!!! I want it!!! I can’t wait to see what you do with it. I would love to do a COE one day.. Go 6x6 that would be awesome. 👍
It sanded pretty well I think. I got it pretty smooth with 80 grit paper. I worked by hand to keep the heat down. And just went around till I ran out of paper.

Now I want to mount the body somehow. Then tomorrow I’ll get some primer. The print feels flexible to me and I’m thinking fiberglass is way to ridge. What type of glue would I use to strengthen panels. Some areas are not attached at all.

Behind the hood is a 2 mm gap.
Could use some glass resin for strength in weak points
 
Last edited:
I got this far.
It’s primed and painted. I spent a couple nights just working on panel lines.
It is assembled and painted. This paint needs to dry for a couple days. Not sure what to do next.

Maybe faded markings and then flat black. Or just weather it as is.

Definitely need glass now.
 

Attachments

  • 5BF6F334-609C-45A3-8B08-7D630B0B70CD.jpeg
    5BF6F334-609C-45A3-8B08-7D630B0B70CD.jpeg
    252.8 KB · Views: 39
  • A9600E2B-5A36-4D21-A31D-D24A289C7D2E.jpeg
    A9600E2B-5A36-4D21-A31D-D24A289C7D2E.jpeg
    253.9 KB · Views: 43
  • 2F04530E-7E4C-4730-A432-A7B18AFBA446.jpeg
    2F04530E-7E4C-4730-A432-A7B18AFBA446.jpeg
    301.9 KB · Views: 40
  • 814A97FA-FD21-4781-A6FF-0D13A2AD07A1.jpeg
    814A97FA-FD21-4781-A6FF-0D13A2AD07A1.jpeg
    274.8 KB · Views: 44
Whoa! Damn bro, you did a good job on that. Rust it up man.
 
Love it so far, can’t wait to see what’s to come 👍
 
Finished securing the lights and wiring. Just simple led for lights nothing special .
I put in some glass and now I need to start weathering. Need to practice on some scrap first.
 

Attachments

  • DC98F2C0-B8E6-44C9-A8A8-E1F629BD30F4.jpeg
    DC98F2C0-B8E6-44C9-A8A8-E1F629BD30F4.jpeg
    249.3 KB · Views: 40
Finished securing the lights and wiring. Just simple led for lights nothing special .
I put in some glass and now I need to start weathering. Need to practice on some scrap first.
Ohhhh do I love this truck!!!! I have trades 😊
 
Been thinking about the finish. Rust and all the little stuff.

One big elephant in the room is the carbon fiber frame.
Leaving it and putting a rusty body on a carbon frame has its merits.

I can paint the frame green and brown rust and that would be more scale.

I could make it look like a nice clean well preserved old truck.
If I had an old truck I would fix it up and not leave it rusting.
Going to look at it for a while.
 

Attachments

  • image.jpg
    image.jpg
    297.9 KB · Views: 42
  • image.jpg
    image.jpg
    282.9 KB · Views: 38
Back
Top