3D printed Soviet ZIS-151/CA10 Truck

Welcome to RCTalk

Come join other RC enthusiasts! You'll be able to discuss, share and private message with other members of our community.

This site may earn a commission from merchant affiliate
links, including eBay, Amazon, and others.

Iowa crawler

Hardcore RCTalk User
Build Thread Contributor
Messages
1,486
Reaction score
2,611
Location
Iowa
RC Driving Style
  1. Racing
  2. Crawling
  3. Scale Builder
  4. Flying
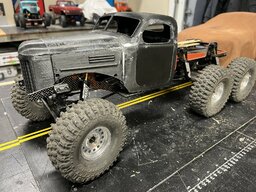
This is going to be a strange project. It is out of my wheelhouse and a challenge. So I accept it as such. Failure is going to be listed as plan A. Then just move on to plan B.

Everyone is getting tired of the power wagon bodies. I like them but don’t want three. Plus I really like hard body trucks after building the two comp trucks.

I have no idea what I’m going to build either. But I bought the body for 65 bucks and that’s about the cost of a power wagon.

My big choices are 4x4 or 6x6
Tube back, pick up or a flat bed stake body.

With the pinched nose I’m not sure about servo on axle or CMS.

I do have a light kit I made up with cool headlights.

2C05E701-F801-4AF6-9A87-65D0F3CAD04A.jpeg
852F03B0-BAEC-4852-A9C9-603A7D154C6B.jpeg
5B54219B-01CE-492A-A3AC-79DED7368618.jpeg
 
Last edited:
Reminds me of the snow runner game. I always wanted to do a soviet truck. Gonna see how this pans out.
 
I'd love to see a 65 Ford truck build. Or even a 54 with a tube rear. That is on my list of things I want to build some day.
 
I have a lot of options with this. One problem is this is a little out of my wheel house fitting a body like this.
But what a beast.
 

Attachments

  • 50225FBF-D651-40E9-A64D-D70ED844F89A.jpeg
    50225FBF-D651-40E9-A64D-D70ED844F89A.jpeg
    517.9 KB · Views: 54
I’m going to have to cut the frame or the body. I can mount headlights or fenders to the frame if I cut the body. Gottta figure out a bumper and lights. The fairlead.
Biggest problem is I just stripped the 6x6 motor and teans to build the G spot and I’m going racing in two months.
Going to have to push a pause button on this. It’s to cool to mess up.
 
Murdering some lines
 

Attachments

  • 565B2D9B-CD9C-4380-B558-D03DCCD06DC8.jpeg
    565B2D9B-CD9C-4380-B558-D03DCCD06DC8.jpeg
    14.3 KB · Views: 42
I am kinda going to get to work on my 3D printed body.

Any suggestions on how to fill the grain.

I have some small pieces to experiment with.

I have two concerns. One is strength and the other is outside finish.

The body is printed in many pieces and glued together with what looks like crazy glue and baking soda.

My plan is to grind the inside somewhat smooth to reduce weight and to remove sharp corners. Then used fiberglass mat and woven cloth in small pieces and strips to reinforce the pieces and hold it all together when it falls.
Then on the outside I would just use a fiberglass gel and skim it very lightly. Then sand that smooth and use regular filler and primer to smooth it all out for paint. The paint is another story all together.

I have not done body and paint work on 3D printed stuff before.
Sanding seems to raise up some sort of grain. Scraping the body seems to work best as it leaves a super smooth finish.
 
I always spray with about 5 or 6 coats of sandable primer, lightly sanding between coats. I also use a little paint putty where needed.

I hope they didn't glue it with crazy glue. It doesn't work worth a damn on PLA. I have yet to try Weldom 4 by 3m, but I hear that may be the ticket. I used to use EMA Plastic Weld, but that is a UK brand and you can't get it here in the states anymore. But it worked awesome for PLA.
 
From the limited research I have found, I should start with 80 to 1000 grit and sand all the grain striations away.
 
From the limited research I have found, I should start with 80 to 1000 grit and sand all the grain striations away.
This was started with 120 to even out a few areas, then sprayed with primer about 12 times, sanding in between costs with 240 and 320 before applying the paint.
received_2572005789788821.jpeg
 
Back
Top